Eyeball cake pops are a spooky yet delightful treat perfect for Halloween. You'll make them with a moist cake center, coat them in melted white chocolate, and top them with realistic-looking candy eyeballs for visual appeal. The concept dates back to ancient civilizations, where eye-shaped desserts held symbolic meaning. You can customize the flavors and decorations to enhance the baking experience. Be sure to store them properly and serve these festive pops at your Halloween party – your guests will be delighted by their lifelike appearance. And if you're curious to learn more, the recipe overview provides helpful tips for success.
Key Takeaways
- Eyeball cake pops are a festive Halloween treat made with a moist cake center coated in melted white chocolate and decorated with realistic-looking candy eyeballs.
- The concept of eye-shaped desserts has ancient origins, dating back to civilizations in Egypt and Greece, where they held spiritual significance.
- Eyeball cake pops can be customized with different cake flavors, chocolate coatings, and decoration styles to enhance the baking experience and visual appeal.
- Proper techniques, such as even sizing, setting time, and clean presentation, are crucial for achieving a polished and lifelike appearance of the cake pops.
- Eyeball cake pops are a versatile dessert that can be enjoyed year-round, not just for Halloween, with various customization options to suit different occasions and preferences.
History
Although eyeball cake pops may seem like a modern confectionery trend, their origins can be traced back to ancient civilizations. The practice of shaping desserts into the form of eyes can be found in various cultures throughout history.
In ancient Egypt, for instance, eye-shaped pastries were often used in religious ceremonies, symbolizing the all-seeing eye of the gods. Similarly, in ancient Greece, eye-shaped treats were associated with the goddess Athena, the patron of wisdom and protection.
The use of unique shapes in desserts, like the eye-shaped pastries, reflects a long-standing tradition of creativity in fermented vegetable plating, showcasing how food can be both visually appealing and culturally significant.
Moving forward in time, the concept of eye-shaped sweets continued to captivate bakers and confectioners. During the Middle Ages, European pastry chefs experimented with creating intricate, eye-like desserts, often using almond paste or marzipan to achieve the desired appearance.
These creations weren't only visually striking but also held symbolic meanings, such as representing the spiritual significance of the eye or serving as protective talismans.
Recipe
Eyeball Cake Pops are a spooky and delightful treat perfect for Halloween. These creepy cake pops are made with a moist and flavorful cake center, coated in white chocolate, and topped with a realistic-looking eyeball. They're sure to delight both children and adults alike.
When preparing treats for your furry friends, it's important to consider their safety; for instance, certain human foods, like grapes, can be toxic to dogs, while others, such as apples and pears, can be healthy alternatives.
Whether you're hosting a Halloween party or simply looking for a fun baking project, these Eyeball Cake Pops are a must-try. They're easy to make and can be customized to suit your preferred flavors and decorations.
Ingredients:
- 1 box of your favorite cake mix
- Eggs and oil (as directed on cake mix box)
- 1 cup of prepared frosting
- 12 ounces of white chocolate, melted
- 24 small round candies (such as Skittles or M&Ms) for the "eyeballs"
- Red decorator's gel or food coloring
Instructions:
Bake the cake according to the instructions on the box. Allow the cake to cool completely, then crumble it into a large bowl. Mix in the prepared frosting until well combined.
Roll the cake mixture into 1-inch balls and place them on a parchment-lined baking sheet. Freeze the cake balls for at least 1 hour.
Melt the white chocolate in a double boiler or microwave, stirring frequently until smooth. One by one, dip the frozen cake balls into the melted chocolate, allowing any excess to drip off.
Place the coated cake pops back on the baking sheet and top each one with a small round candy for the "eyeball." Use the red decorator's gel or food coloring to create the "veins" on the eyeball.
Refrigerate the Eyeball Cake Pops for at least 30 minutes to allow the chocolate to set. Serve chilled and enjoy!
Tips:
- For a more intense eye effect, consider using black or yellow candy for the "pupil" of the eyeball.
- Experiment with different cake and frosting flavors to create unique Eyeball Cake Pops.
- Store the Eyeball Cake Pops in an airtight container in the refrigerator for up to 1 week.
Cooking Steps
First, you'll need to melt the chocolate in a double boiler.
For added fun, consider incorporating colorful sprinkles for an extra festive touch, similar to Birthday Cake Blondies.
Once the chocolate's ready, roll the cake balls and dip them in the colored chocolate.
Step 1. Melt Chocolate in Double Boiler
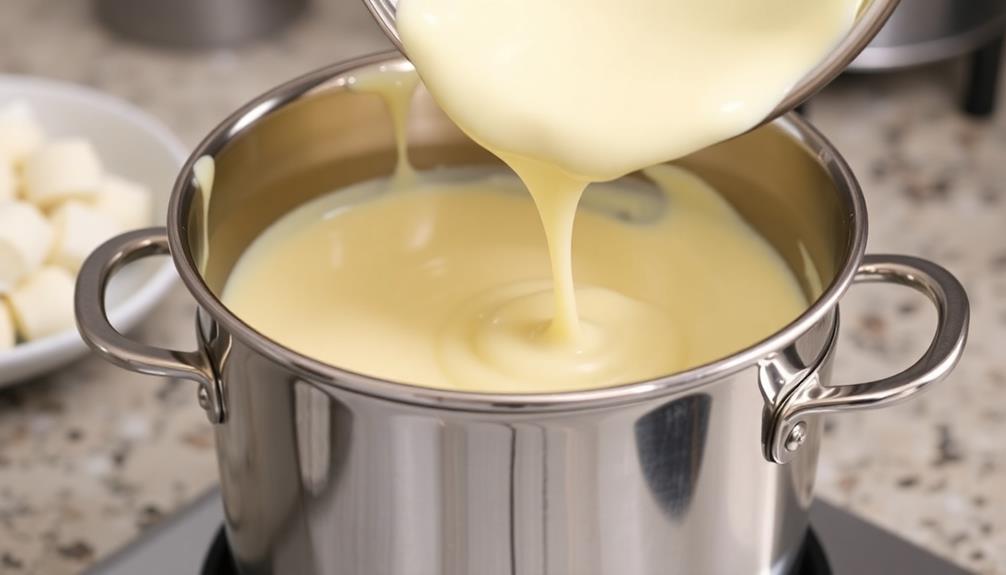
Next, you'll want to melt the chocolate in a double boiler. This gentle heating method ensures the chocolate doesn't scorch or seize up. Start by filling the bottom pan of the double boiler with a few inches of water, then place the top pan on top. Make sure the water doesn't touch the bottom of the top pan.
Adding some herbs to your chocolate, like peppermint, can offer a unique flavor twist and may enhance the experience of your eyeball cake pops unique flavors and benefits.
Add your chocolate of choice to the top pan. Dark, milk, or white chocolate all work great for eyeball cake pops. Slowly heat the water underneath, stirring the chocolate occasionally, until it's fully melted and smooth. Be patient and avoid turning up the heat too high, as this can cause the chocolate to burn. Once the chocolate is melted, carefully dip the cake pops into the chocolate, ensuring they are fully coated. Place them on a lined baking sheet to set. If you’re looking for another delicious dessert to try, I highly recommend the delicious oreo truffles recipe. They are easy to make and always a hit at parties!
Once the chocolate is melted, remove the top pan from the heat. You're now ready to start dipping your cake pop eyeballs! Dip each one carefully, allowing any excess chocolate to drip off before placing them on a parchment-lined baking sheet to set.
Step 2. Roll Cake Balls

After melting the chocolate, it's time to roll the cake balls. Grab the crumbled cake and start forming it into small, evenly-sized balls with your hands. It's best to work in batches, keeping the unformed cake crumbs covered to prevent them from drying out.
As you roll the balls, aim for a smooth, round shape – this will help them hold their form when dipped in the chocolate. For a fun twist, consider adding Birthday Cake Ice Cream to the mix for extra flavor and celebration vibes.
Once you've rolled all the cake balls, it's time to chill them in the fridge. This step is crucial, as it firms up the balls and makes them easier to work with when it's time to dip them in the melted chocolate. Chilling for at least 30 minutes will do the trick, but you can leave them in the fridge for up to an hour if you need to take a break.
Remember to work quickly and gently when handling the chilled cake balls – the cooler temperature can make them more delicate.
With a little practice, you'll have a tray full of perfectly round cake balls, ready to be transformed into spooky, delightful eyeball cake pops.
Step 3. Dip Balls in Colored Chocolate
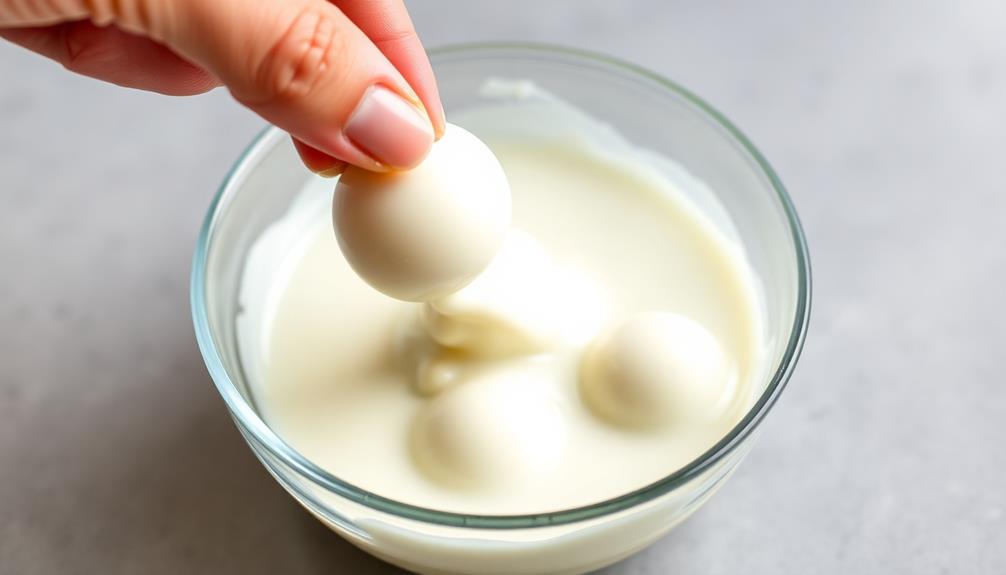
With the cake balls chilled and ready, it's time to bring them to life as spooky eyeball cake pops. Grab your favorite color of candy melts, whether it's deep red for a bloodshot effect or bright white for a classic eyeball look.
Gently melt the candy according to the package instructions, stirring frequently to ensure a smooth, pourable consistency. Remember, while indulging in sweet treats like these cake pops, it's important to consider moderation and health implications associated with high sugar content.
One by one, use a fork or dipping tool to carefully lower the cake balls into the melted candy. Rotate the ball, letting the excess drip off before placing it on a parchment-lined baking sheet.
Work quickly, as the chocolate will begin to set. Once all the balls are coated, it's time to add the final touch – the pupil. Use a toothpick or the tip of a knife to dot a small amount of melted chocolate in the center of each eyeball.
Let the pops cool completely before serving or packaging.
Step 4. Add Candy Eyeballs

To give your eyeball cake pops a truly spooky look, top each one with a small candy eyeball. These edible eyes can be found in the baking aisle of most grocery stores. Gently press a single candy eyeball into the center of the dipped cake ball, applying just enough pressure to make it stick in place.
For an extra creepy effect, you can use different colored candy eyes, such as green or yellow, to create a more unique and unsettling appearance. Alternatively, you can use large candy eyes to make your eyeball cake pops look even more lifelike.
Adjust the size and placement of the eyes to ensure they're positioned evenly on each cake pop. Once the candy eyes are in place, allow the chocolate coating to fully set before serving your spooky eyeball cake pops.
These festive treats are sure to delight your guests and add a delightfully eerie touch to your Halloween party.
Step 5. Allow to Fully Set

Once you've carefully placed the candy eyes, it's important to let the chocolate coating fully set before serving. This step ensures the eyeballs stay firmly in place, creating a professional-looking and visually striking dessert.
Be patient and allow at least 30 minutes for the chocolate to harden completely. You can speed up the process by placing the cake pops in the refrigerator or freezer for 10-15 minutes, but be sure not to leave them in too long, as this can affect the texture.
As the chocolate sets, you'll notice the colors become more vibrant and the surface takes on a smooth, glossy finish. This is a good sign that your cake pops are ready to serve.
Once the chocolate is fully set, you can carefully remove any excess drips or smudges around the base of the pops, ensuring a clean and polished presentation.
With a little time and care, your eyeball cake pops will be the perfect spooky treat to delight your guests.
Final Thoughts
Ultimately, you've conquered the challenge of crafting these eerie eyeball cake pops. As you admire your creations, take a moment to bask in the satisfaction of your accomplishment.
These delightful treats are sure to impress party guests and delight trick-or-treaters alike. While the process may have required patience and attention to detail, the end result is well worth the effort.
Moving forward, consider experimenting with different cake flavors or decorative touches to put your own unique spin on the design. Perhaps you'll try adding a drizzle of chocolate or a sprinkle of edible glitter for an extra touch of whimsy.
Regardless of how you choose to customize them, these eyeball cake pops are a versatile and playful dessert option that can be enjoyed year-round.
Frequently Asked Questions
Can I Use Regular Cake Mix Instead of Homemade?
Yes, you can absolutely use a regular cake mix instead of homemade cake when making cake pops.
In fact, store-bought mixes can work just as well and save you time. Just be sure to follow the instructions on the box, bake the cake, and then crumble it up as you'd with a homemade cake.
This easy swap can simplify the process while still allowing you to create delicious, eye-catching cake pops.
How Long Do the Cake Pops Last?
Your homemade cake pops can last up to a week when stored properly.
Keep them in an airtight container at room temperature, and they'll stay fresh and delicious.
If you need to store them for longer, pop them in the fridge – they'll last around 2 weeks there.
Just remember to bring them back to room temperature before serving for the best texture and flavor.
With proper storage, you can enjoy your cake pops for days to come!
Can I Use Different Colored Candy Melts?
Absolutely, you can use different colored candy melts to create unique and eye-catching cake pops.
The color possibilities are endless, allowing you to match your cake pops to any theme or occasion.
Just be sure to melt the candy melts according to the package instructions, and consider using multiple colors for a vibrant, multi-colored effect.
With a little creativity, you can unleash your inner artist and make your cake pops truly stand out.
Do I Need Special Cake Pop Tools?
You don't necessarily need special cake pop tools to make delicious cake pops.
While they can make the process a bit easier, you can use common kitchen items like a melon baller, spoon, or even your hands to shape and dip the pops.
The key is to find what works best for you and your desired look.
With a little creativity and practice, you can create amazing cake pops without specialized equipment.
Can I Freeze the Cake Pops?
Sure, you can definitely freeze your cake pops!
In fact, freezing them is a great way to make them last longer and have them ready to go whenever you need them.
Just make sure to let them cool completely before popping them in the freezer.
When you're ready to enjoy them, simply thaw them at room temperature. Easy peasy!
Frozen cake pops can stay fresh for up to 3 months, so feel free to make a big batch and save some for later.