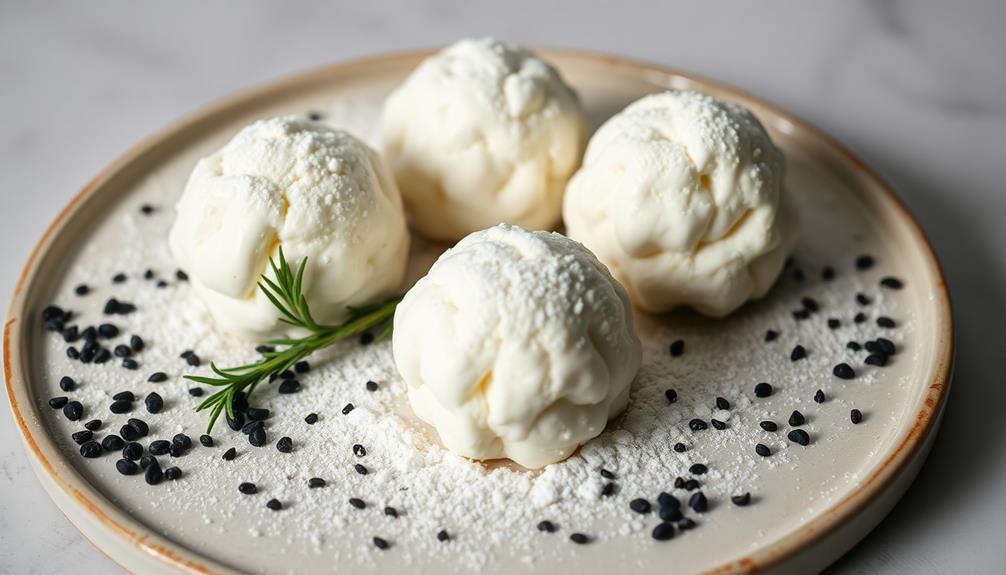
Ghostly Gouda Cheese Balls are a uniquely delicious Halloween treat originating from a Dutch dairy farm in the late 1800s. These creamy, smoky cheese balls feature a striking ghostly appearance thanks to their black sesame seed and powdered sugar coating. They're easy to prepare, with a simple recipe that combines shredded Gouda, cream cheese, and spices before baking and chilling. The result is a mouthwatering snack that's perfect for spooky gatherings, complementing the flavors with a perfect textural contrast. Intrigued? Read on to discover more about these hauntingly good cheese balls. If you want to add a fun and festive twist to your Halloween spread, these Ghostly Gouda Cheese Balls are a must-try. The ghostly gouda recipe has been passed down through generations, and it’s a great way to pay homage to the dairy farm’s rich history while also delighting your guests with a truly unique and memorable treat. Whether you’re hosting a spooky soiree or just looking for a fun snack to enjoy with your family, these cheese balls are sure to be a hit.
Key Takeaways
- Ghostly Gouda Cheese Balls are a unique Halloween-themed snack featuring a subtle smoky flavor and a ghostly appearance from black sesame seeds and powdered sugar.
- The recipe for these cheese balls originated from a small dairy farm in the Netherlands in the late 19th century, where a cheesemaker accidentally aged Gouda in a haunted cellar.
- The cheese balls are easy to prepare, customizable for various spooky gatherings, and suitable for adding Halloween magic to any snacking repertoire.
- The creamy, rich Gouda cheese provides a savory base, while the crisp, airy coating adds a delightful texture contrast, creating a mouthwatering experience.
- These cheese balls can be served as an appetizer for Halloween parties, paired with dipping sauces, and are suitable for both casual snacks and formal events.
History
According to historical accounts, the origins of Ghostly Gouda Cheese Balls can be traced back to a small dairy farm in the Netherlands during the late 19th century.
The story goes that the farm's cheesemaker, a superstitious fellow, accidentally left a batch of Gouda cheese to age in the farm's cellar, which was rumored to be haunted. This peculiar event parallels the ancient practices of using natural fermentation and aging techniques seen in traditional cheeses, similar to how chia seeds played a crucial role in the dietary practices of Mesoamerican cultures.
Over the course of several months, the cheese took on a peculiar greenish hue and developed an uncanny, otherworldly flavor. Word of the "ghostly" cheese spread, and soon, people from all over the region were clamoring to get their hands on this unique delicacy.
The dairy farm quickly capitalized on the cheese's newfound popularity, shaping it into bite-sized balls and marketing them as "Ghostly Gouda Cheese Balls." The recipe and techniques were passed down through generations, ensuring the continued production of this delightfully spooky cheese.
Recipe
Ghostly Gouda Cheese Balls are a delightful and whimsical treat perfect for Halloween celebrations.
These cheese balls are infused with a subtle smoky flavor, creating a haunting yet delectable snack. The addition of black sesame seeds and a dusting of powdered sugar gives them a ghostly appearance, adding to the festive atmosphere.
Similar to Dirt Cups, these treats are easy to prepare and can be customized for your spooky gathering.
Whether you're hosting a spooky gathering or simply looking to add a touch of Halloween magic to your snacking repertoire, these Ghostly Gouda Cheese Balls are sure to delight your guests and satisfy your cravings.
Cooking Steps
Preheat your oven to 350°F.
Next, mix all the ingredients together until well combined.
Using the same approach of efficiency and smooth application found in airless paint sprayers, scoop the mixture into small, equal-sized balls and place them on a baking sheet.
Bake the cheese balls until they're lightly browned, and don't forget to chill them before serving for the best flavor and texture.
Step 1. Preheat Oven to 350°F

Before you can start preparing the ghostly Gouda cheese balls, you'll need to preheat your oven to 350°F. This important step ensures your oven is at the perfect temperature to bake the cheese balls to perfection.
A well-preheated oven can make a significant difference, much like how high refresh rates can enhance gaming experiences. Take a moment to double-check that your oven is set to the correct temperature – 350°F.
Once you've confirmed the temperature, you can go ahead and turn on the oven. It'll take a few minutes for the oven to reach the desired heat, so use this time to gather the rest of your ingredients and prepare your workspace.
Having everything ready to go will make the assembly process seamless. While you wait for the oven to preheat, you can start mixing the cheese filling or rolling the dough into balls.
Just be sure to keep an eye on the oven, and once it's reached 350°F, you can pop the cheese balls right in. This simple yet crucial step sets the stage for your spooktacular cheese ball creation.
Step 2. Mix All Ingredients
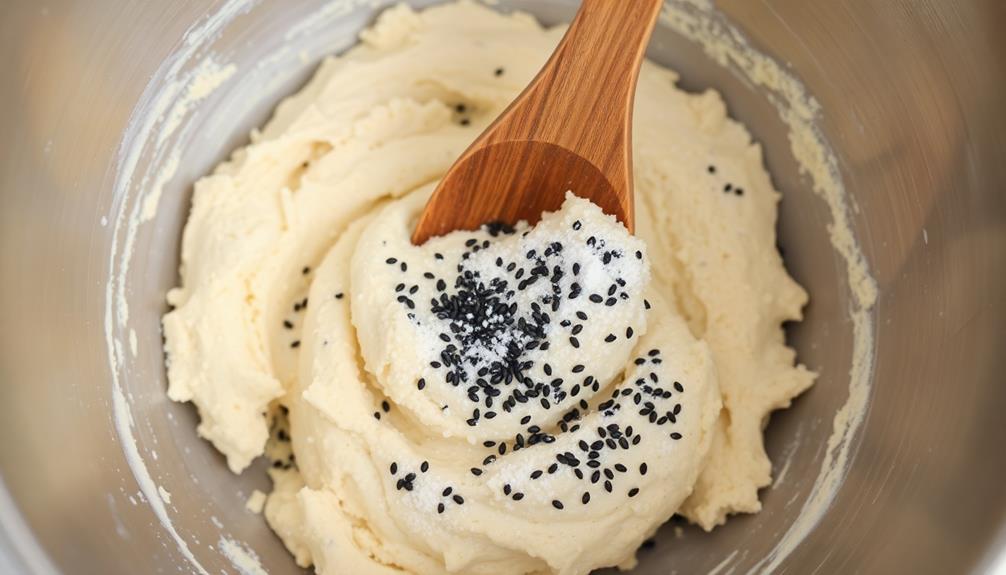
In a large bowl, combine the shredded Gouda cheese, cream cheese, garlic powder, onion powder, and a pinch of salt. Using a hand mixer or a sturdy wooden spoon, mix the ingredients until they're well incorporated and the mixture is smooth.
You don't want any lumps or dry spots – the goal is a creamy, homogenous blend. For an extra layer of flavor, consider adding a touch of fresh herbs or spices to enhance your cheese balls, similar to how effective hydration techniques can boost your skin's vitality.
Next, scoop out heaping tablespoon-sized portions of the cheese mixture and roll them into balls between your palms. Place the cheese balls on a parchment-lined baking sheet, spacing them about an inch apart.
Once you've formed all the cheese balls, it's time to chill them in the fridge for at least 30 minutes. This will help them firm up and hold their shape better when you bake them.
After the chilling time, you're ready to pop the cheese balls in the preheated oven. Bake them for 15-20 minutes, or until they're lightly golden and slightly puffed up.
Be careful not to overbake, as you want the centers to stay nice and soft.
Step 3. Scoop Mixture Into Balls
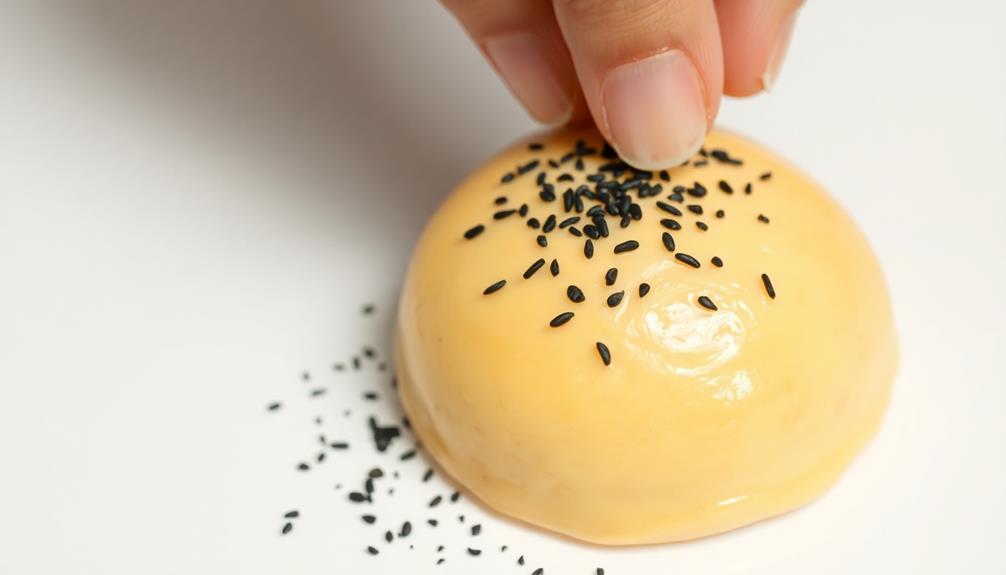
Next, scoop out heaping tablespoon-sized portions of the cheese mixture and roll them into balls between your palms. This step is where the fun really begins!
Gently cupping the mixture in your hands, use gentle pressure to shape the cheese into smooth, uniform spheres. Be mindful not to overwork the dough, as this can make the balls dense and tough. Instead, allow the natural cohesion of the ingredients to do the work for you.
As you roll, the soft, pliable texture of the cheese should mold easily to your touch. Aim for golf ball-sized portions, or adjust the size to your preference.
Once you've shaped a batch, arrange the cheese balls on a parchment-lined baking sheet, ensuring they're spaced apart to prevent sticking.
Repeat this process until you've used up all the cheese mixture, creating a delightful array of ghostly Gouda spheres, ready for the next step in the recipe.
Step 4. Bake Until Lightly Browned
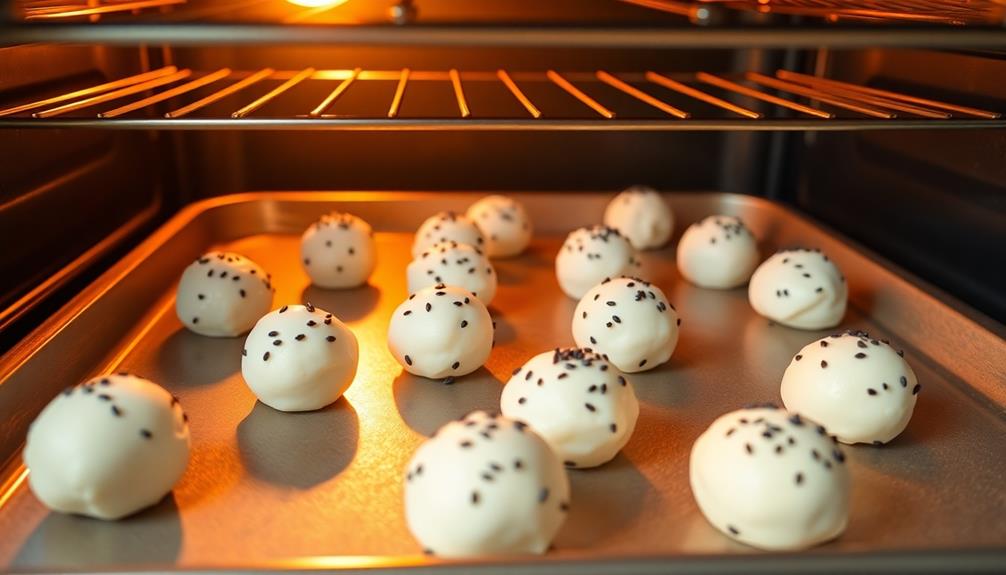
Preheat your oven to 350°F (175°C). Line a baking sheet with parchment paper or a silicone baking mat.
Carefully scoop the cheese ball mixture using a spoon or small cookie scoop, forming them into small, bite-sized rounds. Gently place the cheese balls onto the prepared baking sheet, spacing them about an inch apart.
Bake the cheese balls for 12 to 15 minutes, or until they're lightly browned on the outside. Keep an eye on them to ensure they don't overbake, as you want them to remain soft and creamy on the inside.
The cheese balls should puff up slightly as they bake, creating a nice, rounded shape.
Once they're done, remove the baking sheet from the oven and let the cheese balls cool for a few minutes before serving.
Serve the Ghostly Gouda Cheese Balls warm, as the melted cheese inside is sure to delight your guests. Enjoy this spooky and delicious Halloween treat!
Step 5. Chill Cheese Balls Before Serving
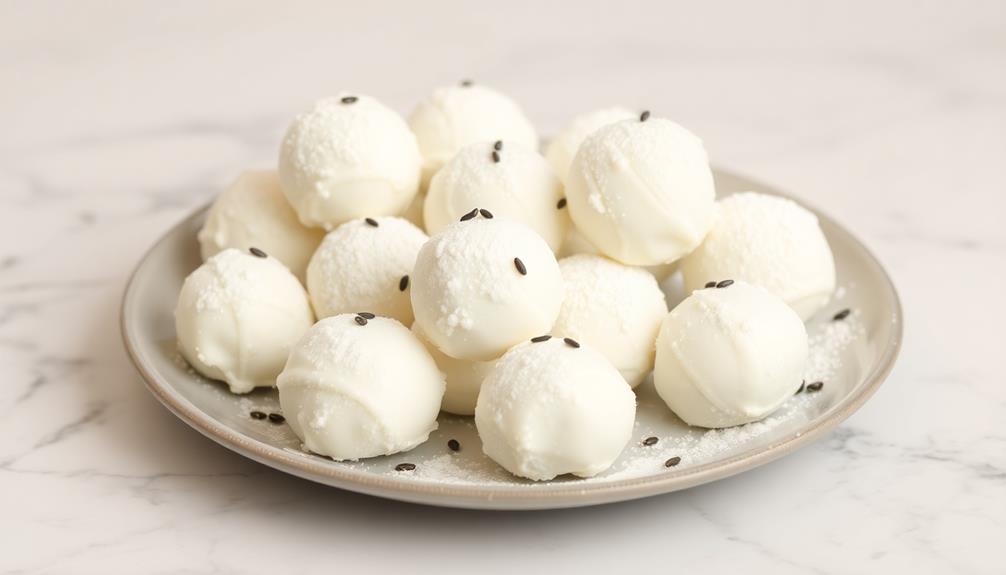
After baking, let the cheese balls cool for a few minutes on the baking sheet. This will help them firm up before you transfer them to a serving platter.
Once they've had a chance to cool, it's time to chill them before serving. Grab a large plate or baking sheet and line it with parchment paper or a silicone baking mat.
Carefully transfer the cheese balls to the prepared surface, making sure they're not touching each other. Pop the tray into the refrigerator and let the cheese balls chill for at least 30 minutes, or up to 2 hours.
This chilling time is crucial – it helps the cheese solidify and the coating adhere better. When you're ready to serve, arrange the chilled cheese balls on a platter.
They'll hold their shape beautifully and the coating won't get messy. Serve with your favorite crackers, bread, or veggies, and enjoy the delightfully creamy and flavorful ghostly gouda bites!
Final Thoughts
As you prepare to enjoy these ghostly Gouda cheese balls, take a moment to reflect on the delightful fusion of flavors and textures. The creamy, rich Gouda paired with the crisp, airy coating creates a mouthwatering contrast that's sure to delight your taste buds.
These cheese balls aren't only visually striking but also surprisingly easy to prepare. With a little advance planning and a few simple ingredients, you can create a spooky and sophisticated appetizer that will impress your guests.
The chilling process helps the cheese maintain its shape and texture, ensuring each bite is a perfect balance of savory and indulgent.
Whether you're hosting a Halloween party or simply looking for a unique and flavorful snack, these ghostly Gouda cheese balls are a must-try. Enjoy the delightful combination of flavors and textures, and savor the festive spirit they bring to any occasion.
Frequently Asked Questions
Do the Cheese Balls Have Any Supernatural Properties?
No, the cheese balls don't have any supernatural properties.
They're simply delicious, savory snacks made with regular cheese. While they may have a spooky name, these cheese balls aren't haunted or imbued with otherworldly abilities.
They're just tasty, bite-sized treats you can enjoy without worrying about any paranormal activity.
Grab a few and savor the creamy, flavorful cheese – no ghosts or goblins required!
Are the Cheese Balls Safe to Consume for Vegetarians?
The cheese balls are indeed safe for vegetarians to consume.
As long as they don't contain any animal-derived ingredients, such as gelatin or rennet, vegetarians can enjoy these savory treats without concern.
Just be sure to check the ingredient list carefully before purchasing or preparing the cheese balls.
With the right selection, vegetarians can indulge in the delicious flavor without compromising their dietary preferences.
How Long Can the Cheese Balls Be Stored?
The cheese balls can be stored for up to a week in the refrigerator.
Simply place them in an airtight container or resealable bag and they'll stay fresh.
For longer-term storage, you can freeze the cheese balls for up to 3 months.
Just be sure to thaw them in the fridge before serving.
With proper storage, you can enjoy these delicious treats for days or even weeks to come.
Can the Recipe Be Modified to Make Other Flavors?
Absolutely! The recipe for these delightful cheese balls can be easily modified to create other flavorful variations.
Simply swap out the Gouda cheese for your preferred type, such as cheddar, feta, or even cream cheese.
You can also experiment with different seasonings, herbs, and spices to achieve your desired taste profile.
Get creative and have fun exploring new flavor combinations to suit your personal preferences or impress your guests.
Do the Cheese Balls Contain Any Artificial Preservatives?
Good question! The cheese balls don't contain any artificial preservatives.
They're made with simple, natural ingredients like real cheese, herbs, and spices. You can feel good about serving them to your guests, knowing they're free from any sketchy additives.
And the best part? You can easily customize the flavors to suit your taste buds. Get creative and experiment with different cheese varieties and seasonings to make the recipe your own!