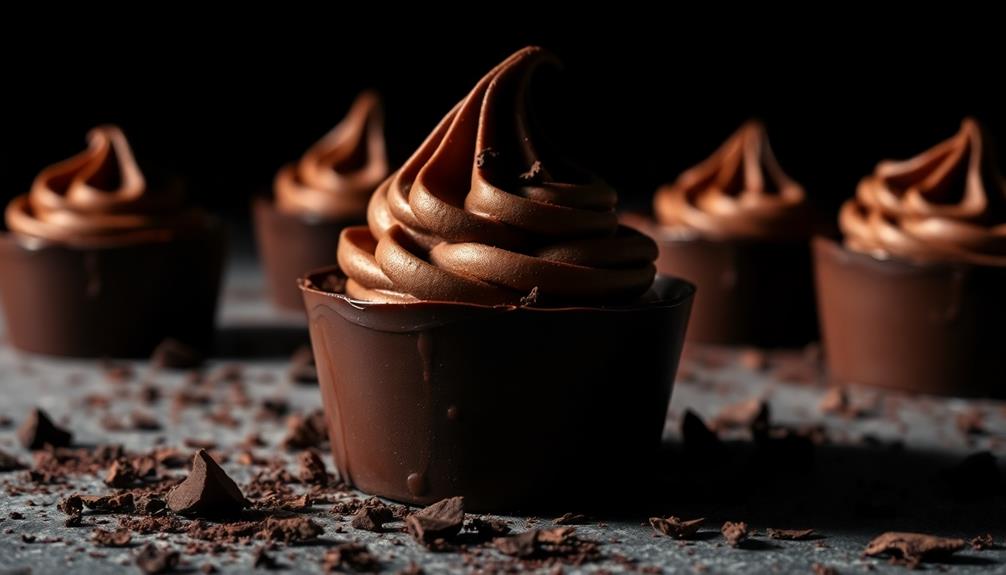
Graveyard Chocolate Mousse Cups, a spookily delightful dessert, have delighted Halloween hosts since the 1960s. This indulgent treat features a crisp chocolate shell encasing a creamy, airy mousse – the perfect balance of flavors and textures. Start by melting high-quality bittersweet chocolate, then fold in whipped cream and egg whites for a light, fluffy texture. Spoon the mousse into serving cups and chill for at least two hours. Top with crumbled cookie "dirt" and dust with cocoa powder for a ghoulishly gorgeous presentation. Whether you're hosting a spooky soiree or just seeking a hauntingly delicious dessert, these Graveyard Chocolate Mousse Cups are sure to delight. Let's dive deeper to uncover more about this captivating Halloween treat. For an extra spooky touch, consider adding a witch’s hat recipe to the top of each mousse cup. Simply use a sugar cone as the base and attach a chocolate kiss with a dab of frosting. These little edible hats add a whimsical and Halloween-themed element to the dessert, making it a hit with kids and adults alike. Whether you’re a seasoned Halloween party host or just looking for a fun dessert to enjoy with your family, Graveyard Chocolate Mousse Cups are a delicious and entertaining choice. For an added touch of whimsy and fun, consider incorporating an easy witch hat cookie recipe to accompany your Graveyard Chocolate Mousse Cups. This simple recipe can be found online and is a perfect complement to the spooky dessert. The combination of the witch hat cookies and the mousse cups will surely be a hit at any Halloween gathering.
Key Takeaways
- Graveyard Chocolate Mousse Cups are an indulgent dessert featuring a creamy chocolate mousse inside a dark chocolate shell, creating a visually striking presentation.
- The recipe originated in the 1960s by creative home bakers, inspired by savory Halloween appetizers and traditionally served in ceramic or porcelain casket-shaped containers.
- The key ingredients are high-quality bittersweet chocolate, heavy cream, egg whites, and sugar, resulting in a light and airy mousse texture.
- The mousse cups are refrigerated for at least 2 hours to allow the mousse to set and achieve the optimal creamy consistency, contrasting with the crisp chocolate shell.
- Garnishes such as crumbled cookies, cocoa powder, or whipped cream can be added to enhance the graveyard theme and complement the chocolate flavor.
Top picks for "graveyard chocolate mousse"
Open Amazon search results for this keyword.
As an affiliate, we earn on qualifying purchases.
History
When did the Graveyard Chocolate Mousse Cups originate? These decadent desserts have a fascinating history that dates back to the 1960s. The idea for these spooky-yet-delicious cups was first conceived by a group of creative home bakers who wanted to put a ghoulish twist on a classic chocolate mousse. Inspired by the creativity often seen in savory appetizers like crab cakes and shrimp ceviche, they sought to create a visually striking dessert for Halloween festivities.
Originally, the cups were made using real ceramic or porcelain containers, often shaped like miniature caskets or tombstones. The rich chocolate mousse was piped or spooned into these edible "graves," then topped with crushed cookies or crumbs to resemble dirt. This unique presentation not only added to the overall haunting aesthetic but also allowed the mousse to maintain its smooth, airy texture.
Over the years, the recipe and presentation have evolved, but the core concept remains the same. Today, Graveyard Chocolate Mousse Cups continue to delight Halloween revelers with their spooky yet delectable charm, blending tradition and innovation in a truly memorable dessert.
Recipe
Graveyard Chocolate Mousse Cups is an indulgent and spooky dessert perfect for Halloween celebrations. This chocolatey treat features a creamy mousse nestled in a dark chocolate shell, creating a delightful contrast of flavors and textures.
For a festive twist, consider serving this dessert alongside a savory Italian dish like Easy Tomato Focaccia to balance the sweetness. The key to this recipe is the homemade chocolate mousse, which is light, airy, and bursting with rich cocoa notes.
The chocolate cups provide a satisfying crunch and a visually striking presentation, making this dessert a showstopper on any Halloween table.
Ingredients:
- 8 oz bittersweet chocolate, chopped
- 1 cup heavy cream
- 3 large egg whites
- 1/4 cup granulated sugar
- 1/4 tsp salt
- Chocolate shavings or sprinkles (optional)
Directions:
Melt the chopped chocolate in a double boiler or in the microwave, stirring occasionally until smooth. Allow the melted chocolate to cool slightly.
In a separate bowl, whip the heavy cream until it forms stiff peaks. In a third bowl, beat the egg whites with an electric mixer until they're foamy. Gradually add the sugar and salt, continuing to beat until the egg whites form stiff, glossy peaks.
Gently fold the whipped cream and egg whites into the cooled melted chocolate until the mixture is well combined and smooth. Spoon or pipe the chocolate mousse into the prepared chocolate cups. Refrigerate for at least 2 hours before serving. Top with chocolate shavings or sprinkles, if desired.
Tips:
For best results, use high-quality bittersweet chocolate with a cocoa content of at least 60%.
Be careful not to overbeat the egg whites, as this can cause them to become dry and difficult to fold into the mousse. Serve the chocolate mousse cups chilled, as the contrast between the cold, creamy mousse and the crisp chocolate shell is part of the appeal.
Cooking Steps
First, melt the chocolate in a double boiler.
It's important to use high-quality chocolate for the best flavor, as some brands may contain additional ingredients that can affect the final taste.
Next, whip the cream until it forms stiff peaks.
Gently fold the whipped cream into the melted chocolate, then spoon the mousse mixture into your serving cups.
Remember, moderation is key when enjoying rich desserts like this, as excessive indulgence can lead to health issues such as weight gain and diabetes ice cream and health considerations.
Step 1. Melt Chocolate in Double Boiler
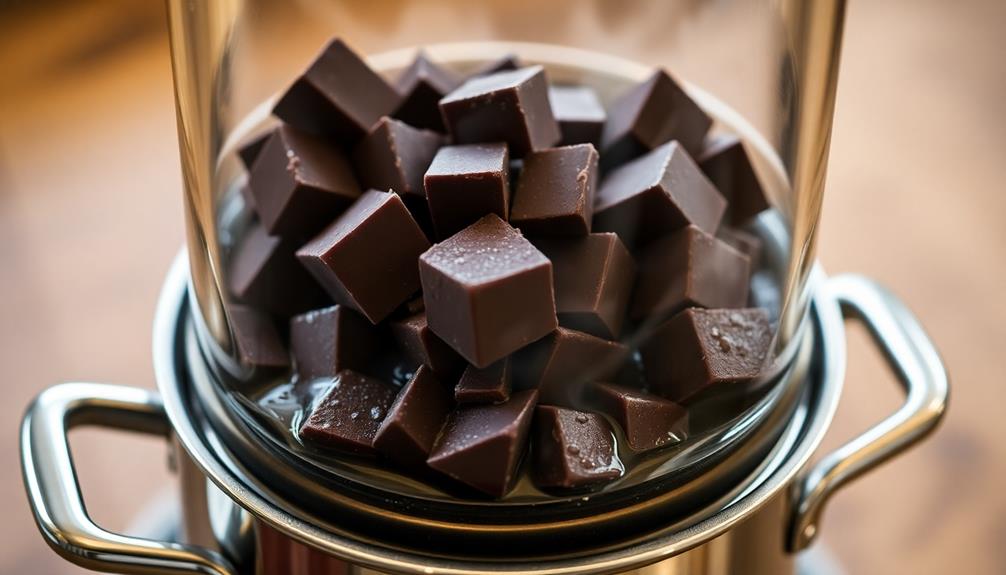
To begin, set up a double boiler on the stove. This contraption consists of a saucepan filled with a small amount of simmering water and a bowl that nestles snugly on top, creating a gentle heat source.
Break the dark chocolate into small pieces and place them in the top bowl. Allow the chocolate to melt slowly, stirring occasionally with a spatula to ensure even heating. It's essential to keep distractions at bay, as focusing on the process will help ensure a smooth melt—much like how essential oils for toothache relief can help you concentrate on comfort during cooking.
Be careful not to let any water or steam seep into the chocolate, as this can cause it to seize up and become unusable.
Once the chocolate has fully melted, remove the bowl from the heat and set it aside. Let the chocolate cool slightly, but not enough to harden.
This tempered chocolate will now be ready to fold into the airy whipped cream, creating the luscious chocolate mousse. Remember to work quickly, as the chocolate will begin to thicken as it cools.
Step 2. Whip Cream Until Stiff Peaks Form
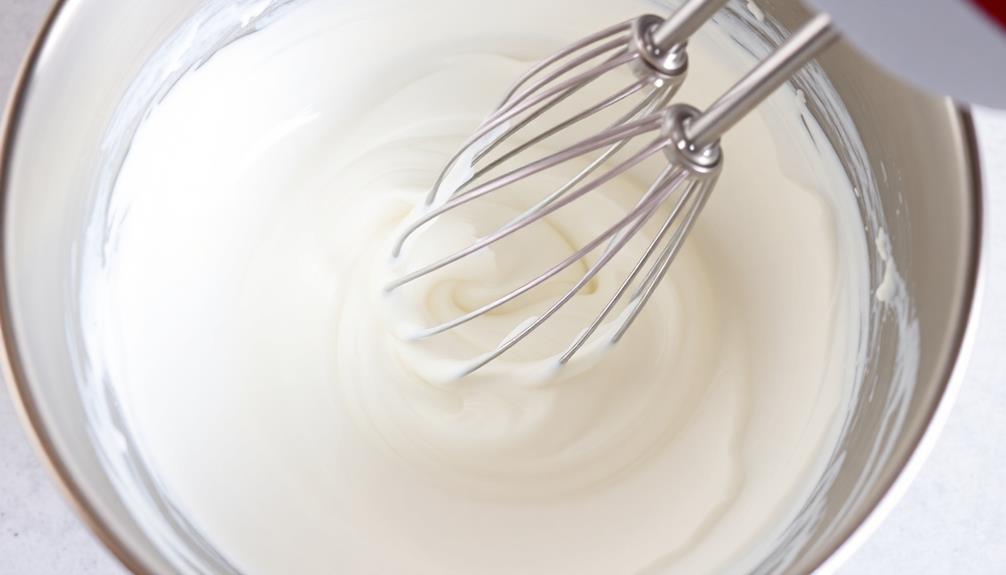
While the chocolate melts, grab a large mixing bowl and add the heavy cream.
Using a hand mixer or stand mixer with the whisk attachment, whip the cream on medium-high speed. As the cream begins to thicken, keep a close eye on it, watching for the formation of stiff peaks. This typically takes around 2-3 minutes, but can vary depending on the speed of your mixer and the temperature of the ingredients.
The fat content in the heavy cream, which is often around 36%, plays a crucial role in achieving that perfect whipped texture, similar to the creamy texture of butter's emulsification process.
Once the cream reaches the desired stiff peak stage, stop the mixer. Be careful not to overwhip, as the cream can quickly turn grainy and separate.
The whipped cream should hold its shape firmly when the beater is lifted. This light, airy texture is perfect for folding into the melted chocolate to create the mousse.
Gently incorporate the whipped cream into the chocolate, taking care not to deflate the mixture. The resulting chocolate mousse will be rich, smooth, and absolutely divine.
Step 3. Fold Whipped Cream Into Melted Chocolate
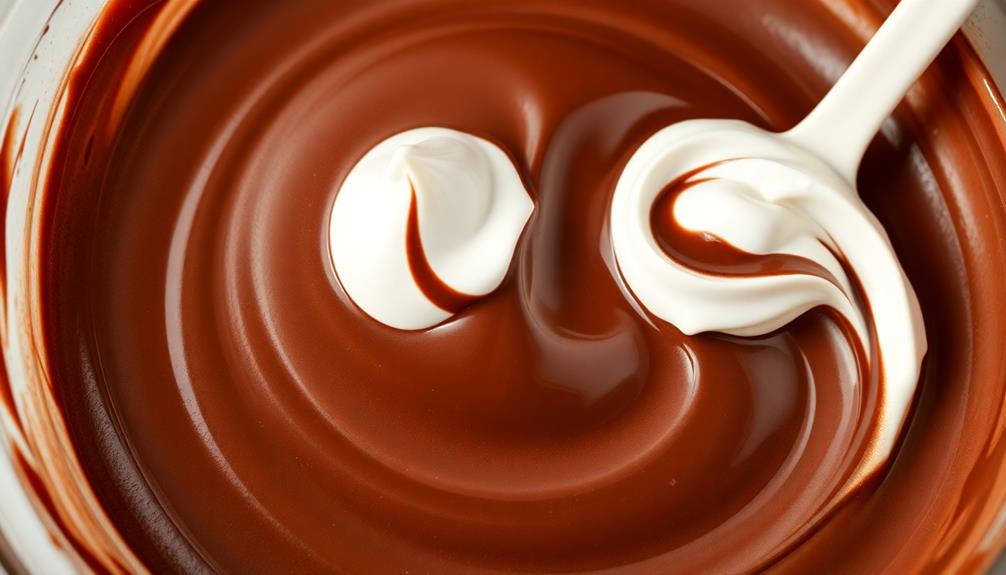
With nimble movements, gently fold the whipped cream into the melted chocolate. This is a delicate dance, requiring a light touch to maintain the airy, velvety texture of the mousse.
Gradually incorporate the cream, using a folding motion to gently incorporate it without deflating the volume you've worked so hard to achieve. Be patient and take your time – this step is crucial for creating the desired mousse-like consistency.
As the cream blends with the chocolate, the mixture will transform into a rich, decadent treat. Ensure the ingredients are fully incorporated, but avoid overmixing, which can result in a dense, heavy texture.
The key is to fold gently and with care, allowing the mousse to maintain its ethereal lightness. With the whipped cream now seamlessly folded in, your chocolate mousse is one step closer to graveyard-worthy perfection.
Step 4. Spoon Mixture Into Serving Cups
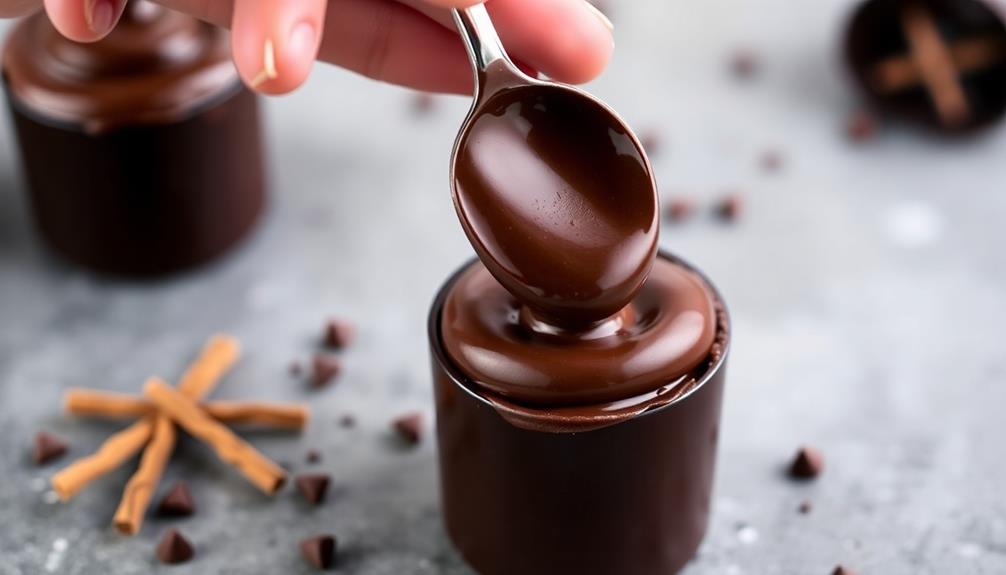
After the velvety chocolate mousse has been so carefully blended, it's time to spoon the mixture into your serving cups.
Grab your individual serving dishes, whether they're ramekins, glasses, or mini cups. Using a large spoon or ladle, gently scoop the rich, decadent chocolate mousse into each container, filling them about three-quarters full.
Be sure to scrape the sides of the bowl to get every last bit of that irresistible chocolate goodness. Once the cups are filled, you can smooth the tops with the back of the spoon for a clean, professional look.
If you have any extra mousse leftover, you can always enjoy it as a little chef's treat!
Now that your cups are ready, you can chill them in the refrigerator until it's time to assemble the rest of your "Graveyard" dessert.
Just wait until your guests see these creamy chocolate masterpieces!
Step 5. Chill Mousse Cups Before Serving
Once the mousse cups are filled, it's time to chill them in the refrigerator before serving. This step is crucial to allow the chocolate mousse to set and firm up, creating the perfect chilled dessert.
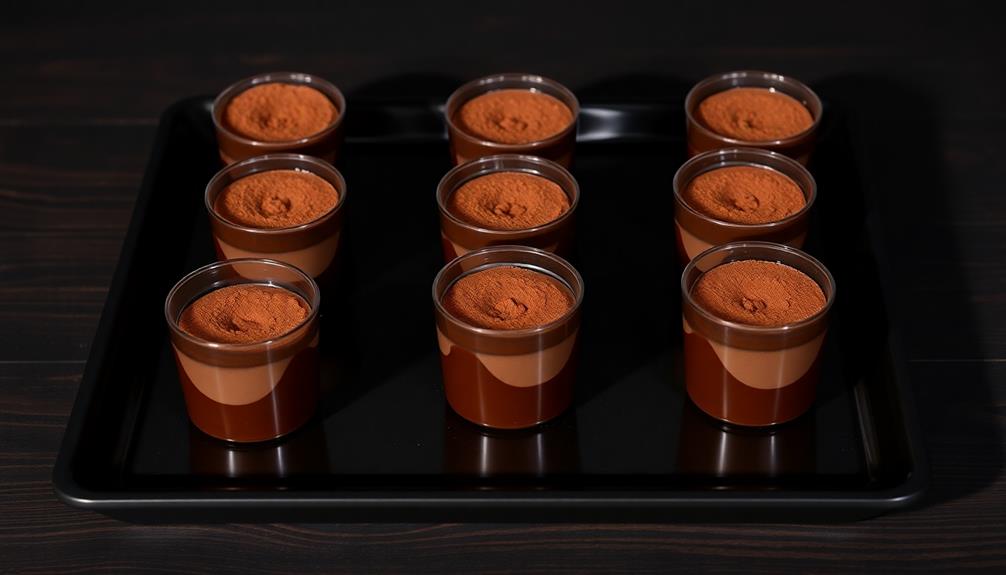
Simply place the filled cups on a baking sheet or plate and slide them into the fridge. Let the mousse chill for at least 2 hours, or up to 24 hours if you're preparing them in advance. This gives the rich, creamy texture time to develop, ensuring a luxurious mouthfeel when your guests take their first bite.
Once the time is up, the mousse cups will be set and ready to serve. Top them with the desired garnishes, such as crumbled cookie pieces or a dusting of cocoa powder, to complete the spooky graveyard theme.
Chilling the mousse is a simple yet essential step that takes your Graveyard Chocolate Mousse Cups from good to great. Enjoy the delightful contrast of the cool, silky smooth mousse with the crunchy toppings.
Final Thoughts
The Graveyard Chocolate Mousse Cups are a delightful dessert that'll transport your taste buds to a hauntingly delicious realm. With their rich, velvety chocolate mousse nestled in edible chocolate cups, these treats are sure to impress your guests.
The chilled cups add an extra layer of indulgence, making each bite a heavenly experience. As you savor the last of the mousse, take a moment to appreciate the harmonious blend of flavors and textures.
The crisp, dark chocolate shell contrasts beautifully with the light, airy mousse, creating a symphony of delight. These desserts are the perfect way to cap off a spooky gathering or to enjoy as a special treat on any occasion.
Frequently Asked Questions
Can the Mousse Be Made Ahead of Time?
Absolutely! The mousse can be prepared ahead of time, making it a convenient and stress-free dessert option.
Simply whip up the mousse, transfer it to individual serving cups or ramekins, and refrigerate until ready to serve. This allows you to get a head start on your dessert, freeing up time on the day of your event.
When it's time to enjoy, simply remove the chilled mousse cups from the fridge and top them as desired. A make-ahead mousse is a great time-saver!
Are the Cups Suitable for Vegetarians?
The cups themselves are typically suitable for vegetarians, as they're usually made from ingredients like graham crackers, cookies, or pastry dough – which don't contain any animal products.
However, you'll want to double-check the specific recipe you're using to ensure all the components are vegetarian-friendly.
If the mousse contains dairy or eggs, you may need to find a suitable vegetarian alternative.
But the cups themselves shouldn't pose any issues for your vegetarian guests.
How Long Do the Cups Stay Fresh?
The cups will stay fresh for 3-5 days when stored properly in the refrigerator.
Make sure to keep them tightly covered to prevent them from drying out.
The chocolate mousse filling is delicate, so you'll want to consume the cups within this timeframe for the best texture and flavor.
With proper storage, you can enjoy these delightful treats for several days after preparing them.
Can the Recipe Be Scaled up or Down?
Yes, the recipe can definitely be scaled up or down!
Adjusting the ingredient amounts is a breeze – simply multiply or divide the quantities to suit your needs.
Whether you're feeding a crowd or just want a small batch, the recipe is flexible enough to accommodate.
Just keep an eye on the cooking time, as larger or smaller portions may require slight variations.
With a little experimentation, you can easily make the perfect amount every time.
What Other Decorations Can Be Added?
You can definitely get creative with the decorations for your chocolate mousse cups!
Try sprinkling crushed Oreos or crumbled graham crackers on top for a textural contrast.
Pipe whipped cream in swirls or rosettes around the edge.
Grate some dark chocolate over the top for a rich, decadent finish.
You could even add a sprinkle of toasted coconut or crushed nuts.
The options are endless – just let your imagination run wild!