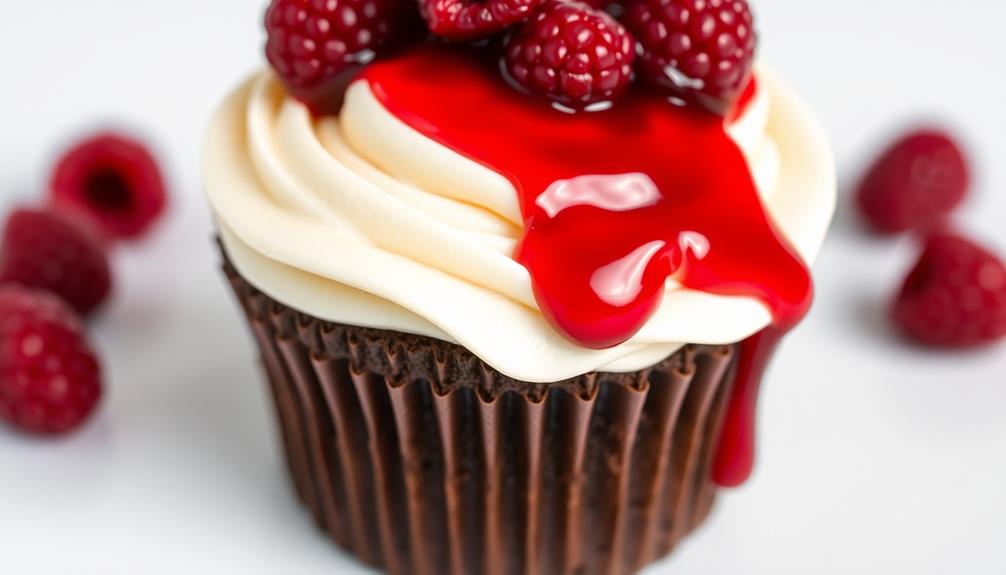
Vampire bite cupcakes offer a spooky, delicious twist on classic chocolate treats. Inspired by the enduring vampire craze, these cupcakes feature a rich chocolate base topped with creamy cream cheese frosting and a dramatic raspberry "bite" mark. Bake the moist, flavorful cupcakes, then let them cool completely before frosting and decorating. The chilled cupcakes are a must for the perfect texture and appearance. Wow your guests with this visually striking dessert that captures the gothic allure of vampire lore. Get ready to unleash your creativity and transform these cupcakes into the star of any Halloween or themed celebration. There's more to discover about this bewitching recipe.
Key Takeaways
- Vampire Bite Cupcakes are a popular Halloween and gothic-themed dessert featuring a rich chocolate cupcake base with cream cheese frosting and a "bite" of raspberry coulis.
- The cupcakes' visual appeal stems from the dark chocolate elements and the red "bite" marks, creating a spooky and enticing presentation.
- The recipe includes a detailed process for mixing dry and wet ingredients, baking, and decorating the cupcakes to achieve the desired look and flavor.
- Proper cooling of the cupcakes is crucial, as it prevents sogginess and ensures the frosting holds its shape, enabling effective decorating.
- Vampire Bite Cupcakes are ideal for Halloween parties and other themed events, offering a delicious and visually striking dessert that appeals to vampire enthusiasts.
Top picks for "vampire bite cupcak"
Open Amazon search results for this keyword.
As an affiliate, we earn on qualifying purchases.
History
Over the centuries, the vampire craze has captured the imaginations of people worldwide. From Bram Stoker's classic novel "Dracula" to the modern vampire sagas, the allure of these immortal, blood-drinking creatures has remained a staple in popular culture.
This fascination has now extended to the culinary realm, with the emergence of the delightful Vampire Bite Cupcakes. These spooky treats, adorned with red "bite" marks and a touch of dark chocolate, are the perfect way to celebrate the vampire mythos in a delicious and visually striking manner.
Similar to how color accuracy enhances visual experiences in projectors, these cupcakes are crafted with attention to detail to create an appealing aesthetic.
Originating from the creative minds of passionate bakers, these cupcakes have become a beloved addition to Halloween parties and gothic-themed gatherings. For those looking to add a spooky twist to their Halloween treats, the black cat cupcakes recipe has become a popular go-to. With its dark and mysterious aesthetic, these cupcakes are sure to be a hit at any Halloween event. The recipe often includes black food coloring for the batter, as well as cleverly placed candy or edible decorations to create the distinct look of a black cat.
Whether you're a longtime vampire enthusiast or simply seeking a fun and festive dessert, Vampire Bite Cupcakes are sure to delight your senses and ignite your imagination, transporting you to the captivating world of the undead.
Recipe
Vampire Bite Cupcakes are a delightfully spooky treat perfect for Halloween or any occasion where you want to add a touch of supernatural flair to your desserts.
These cupcakes feature a rich, chocolatey base with a vibrant red "bite" mark on the top, created by a decadent cream cheese frosting and a raspberry coulis. The moist chocolate cupcakes provide a sturdy foundation, while the tangy cream cheese frosting and tart raspberry coulis create a delightful contrast that mimics the classic vampire bite.
Additionally, you can enhance your skin's texture and hydration while enjoying these treats, as glycolic acid benefits can help improve your overall skin appearance.
Ingredients:
- 1 cup all-purpose flour
- 1/2 cup unsweetened cocoa powder
- 1 teaspoon baking soda
- 1/4 teaspoon salt
- 1/2 cup unsalted butter, softened
- 1 cup granulated sugar
- 2 large eggs
- 1 teaspoon vanilla extract
- 1/2 cup milk
- 8 ounces cream cheese, softened
- 1/2 cup unsalted butter, softened
- 3 cups confectioners' sugar
- 1/4 teaspoon salt
- 1 cup fresh raspberries
- 2 tablespoons granulated sugar
Instructions:
Preheat your oven to 350°F (175°C) and line a 12-cup muffin tin with paper liners.
In a medium bowl, whisk together the flour, cocoa powder, baking soda, and salt. In a large bowl, cream the butter and granulated sugar until light and fluffy. Beat in the eggs one at a time, then stir in the vanilla.
Alternately add the dry ingredients and milk to the butter mixture, mixing just until incorporated. Scoop the batter evenly into the prepared muffin cups, filling them about 3/4 full. Bake for 18-20 minutes, or until a toothpick inserted into the center comes out clean. Allow the cupcakes to cool completely on a wire rack.
For the cream cheese frosting, beat the cream cheese and butter in a large bowl until smooth. Gradually add the confectioners' sugar and salt, beating until light and fluffy.
In a small saucepan, combine the raspberries and granulated sugar. Cook over medium heat, stirring occasionally, until the raspberries have broken down and the mixture has thickened, about 5-7 minutes. Allow the raspberry coulis to cool slightly.
Pipe or spoon the cream cheese frosting onto the cooled cupcakes, then top each cupcake with a spoonful of the raspberry coulis, creating a "bite" mark on the frosting. Serve and enjoy your Vampire Bite Cupcakes!
Cooking Steps
Preheat your oven to 350°F.
In a large bowl, mix together the ingredients until well combined. For a fun twist, consider adding a touch of cinnamon or a cream cheese frosting to elevate the flavor, similar to the Cinnamon Sugar French Toast Bites.
Next, fill your cupcake liners halfway with the batter and bake for 18-20 minutes.
Once the cupcakes have cooled completely, you're ready to serve these spooky and delicious vampire bite treats.
Step 1. Preheat Oven to 350°F
Before you can start baking your vampire bite cupcakes, you'll need to preheat your oven to 350°F. This crucial step ensures your cupcakes bake evenly and rise to perfection.
Make sure your oven is set to the correct temperature by checking the dial or digital display. It's a good idea to use an oven thermometer to confirm the temperature, as some ovens can be a bit finicky and may not heat up to the exact setting.
Additionally, maintaining a clean kitchen environment can help prevent contamination and ensure your baked goods turn out great, similar to how regular cleaning of air purifiers is essential for optimal performance.
Once you've verified the oven is at 350°F, you can go ahead and pop in the cupcake tins. Keep an eye on the baking time, as ovens can vary, and you don't want to end up with vampire bites that are underdone or overdone.
With the oven preheated and ready, you're one step closer to creating those spooky, delicious vampire bite cupcakes that will be the talk of any Halloween party.
Step 2. In a Large Bowl, Mix Ingredients

To craft those spooky vampire bite cupcakes, you'll need to whisk together a few key ingredients in a large bowl. First, grab some all-purpose flour, baking powder, and a pinch of salt. Whisk these dry ingredients until they're well combined.
Understanding the mechanics of different brewing methods can enhance your baking experience, just like it does with coffee. Next, crack a couple of large eggs into the bowl. Add in some granulated sugar and vanilla extract, then beat the mixture until it's light and fluffy.
Slowly pour in melted butter and milk, continuing to mix everything together until the batter is smooth and uniform. Don't overmix, or your cupcakes might end up tough. Finally, fold in some red food coloring – just a few drops will do the trick to give your cupcakes that spooky vampire-inspired hue.
Once the batter is ready, you can portion it out into your prepared muffin tin and pop it in the oven. Get ready for some deliciously haunting results!
Step 3. Fill Cupcake Liners Halfway
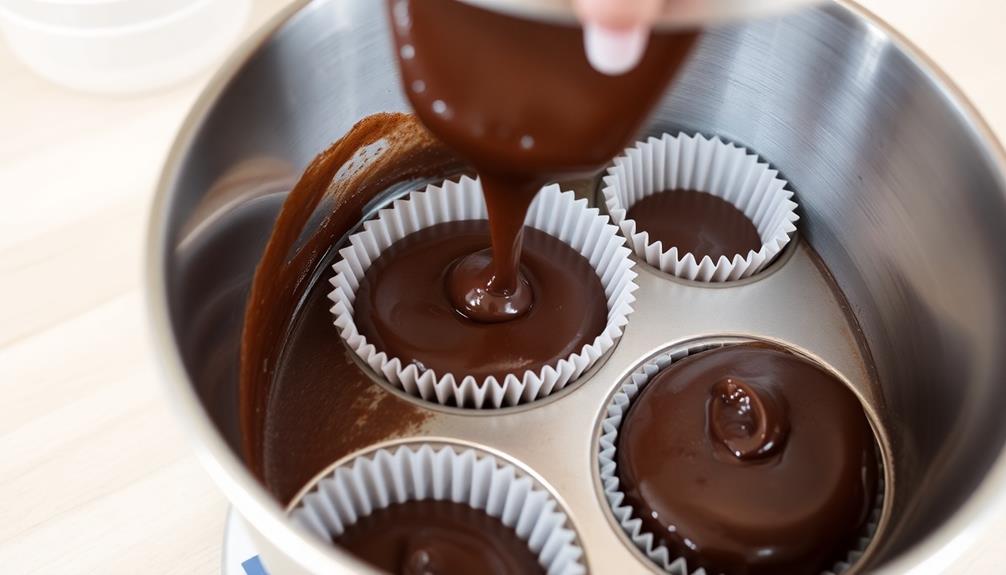
With your cupcake batter ready, it's time to fill the cupcake liners. Grab your muffin tin and ensure the liners are properly placed inside the cups.
Using a spoon or a cookie scoop, gently fill each liner about halfway with the vampire-red batter. Be careful not to overfill, as the cupcakes will rise during baking. Filling them only halfway will allow room for the perfect vampire bite to form on top.
Once all the liners are filled, take a moment to inspect your work. The batter should be evenly distributed, creating a smooth, consistent surface.
If you notice any uneven spots, use the back of your spoon to gently smooth out the batter. This will help ensure a uniform appearance for your vampire bite cupcakes.
With the liners filled, your cupcakes are now ready for the oven. Preheat your oven to the recommended temperature, and bake the cupcakes until a toothpick inserted into the center comes out clean.
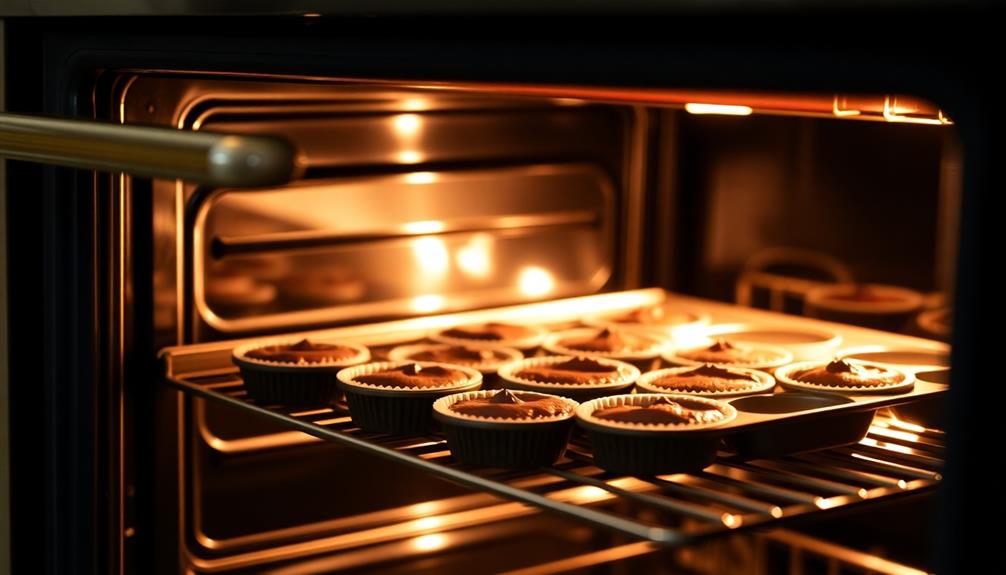
Step 4. Bake for 18-20 Minutes
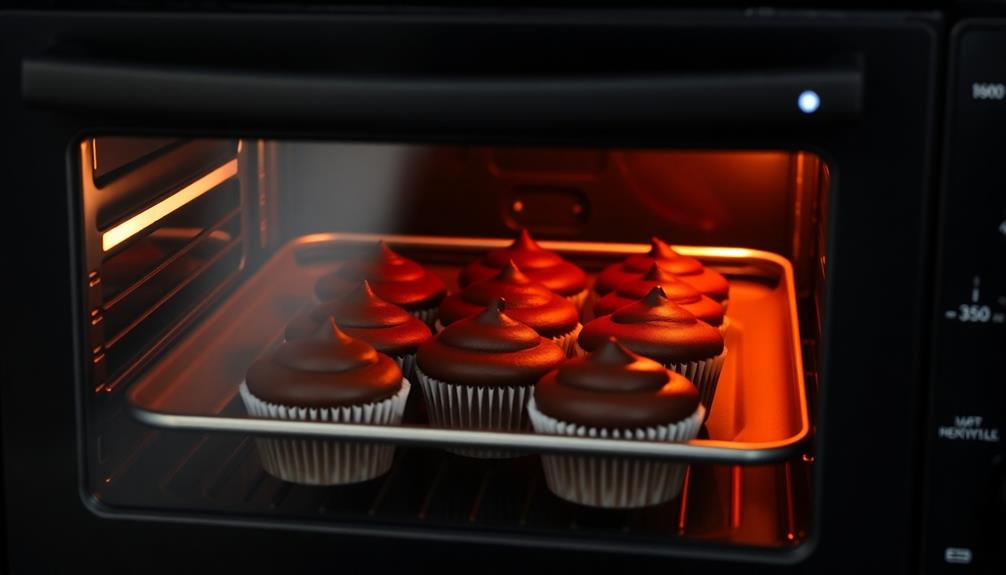
Once the cupcake liners are filled, it's time to bake your vampire bite cupcakes. Preheat your oven to 350°F (175°C) and let it come to temperature.
Carefully place the filled liners onto a baking sheet, making sure they're evenly spaced. This will help the cupcakes bake evenly.
Set a timer for 18-20 minutes and keep an eye on them as they bake. You'll know they're done when a toothpick inserted into the center comes out clean. The cupcakes should also be lightly golden on top.
Be careful not to overbake, as this can result in dry and crumbly cupcakes.
Once the timer goes off, remove the baking sheet from the oven. Let the cupcakes cool in the liners for a few minutes before transferring them to a wire rack to cool completely.
This step is crucial, as it allows the cupcakes to finish cooking and prevents them from getting soggy. With your vampire bite cupcakes baked to perfection, you're one step closer to enjoying these spooky treats!
Step 5. Let Cupcakes Cool Completely
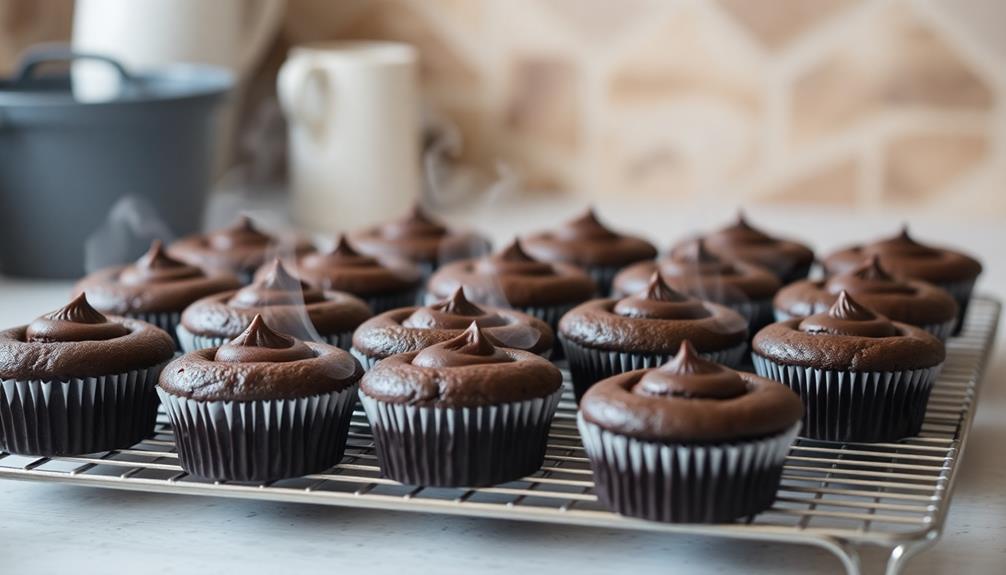
After removing the baked cupcakes from the oven, let them cool in the liners for a few minutes. This brief cooling period allows the cupcakes to set and prevents them from falling apart when you remove them from the pan.
Once the cupcakes have cooled for 5 minutes, transfer them to a wire rack to cool completely. This allows the air to circulate around the cupcakes, ensuring even cooling and preventing any condensation from forming on the surface.
Depending on the size of your cupcakes, this cooling process can take anywhere from 30 minutes to an hour. Be patient and resist the temptation to frost or decorate the cupcakes until they've reached room temperature.
Rushing this step can lead to melted frosting or crumbling cupcakes. Once they're fully cooled, you can unleash your creativity and transform these vampire-inspired treats into spooky, yet delicious, works of art.
The patience you've exercised will be well worth it when you bite into a perfectly moist and fluffy cupcake.
Final Thoughts
Creating vampire bite cupcakes can be a delightfully spooky and creative activity, perfect for Halloween or any occasion where you want to inject a touch of the supernatural.
The process of assembling these decadent treats allows you to unleash your inner vampire, transforming ordinary cupcakes into edgy, blood-curdling delights.
While the earlier steps covered the baking and decorating, the final thoughts are all about embracing the whimsical spirit of these vampire bite cupcakes.
Consider serving them at a themed party, where guests can indulge in the delightfully eerie experience.
Encourage everyone to sink their teeth into the crimson-colored filling, relishing the contrast between the soft, fluffy cake and the gooey, blood-like center.
The dramatic presentation is sure to captivate and delight, making your vampire bite cupcakes the star attraction of any spooky celebration.
Frequently Asked Questions
Can I Use Regular Cupcake Liners Instead of the Special Ones?
Yes, you can absolutely use regular cupcake liners instead of the special ones!
Regular liners will work just fine and give your cupcakes a classic, everyday look. The only difference is that the special vampire-themed liners might add a fun, spooky touch to your creation.
But if you don't have access to those, no problem – regular liners will still let your homemade cupcakes shine.
Go ahead and use what you've got on hand!
How Long Do the Cupcakes Last After Baking?
The baked cupcakes should last 3-4 days when stored properly.
Keep them in an airtight container at room temperature. This helps retain their freshness and prevents them from drying out.
If you need them to last longer, you can store the cupcakes in the fridge for up to a week.
Just be sure to let them come back to room temperature before serving for the best texture and flavor.
Do I Need to Use Artificial Food Coloring?
You don't necessarily need to use artificial food coloring for your cupcakes.
Natural food dyes made from fruits, vegetables, or other plant-based sources can create beautiful, vibrant colors without the potential downsides of synthetic options. These natural dyes may be a bit more subtle in their hues, but they offer a more wholesome and eco-friendly alternative.
Experiment with ingredients like beet juice, turmeric, or spirulina to achieve the desired color palette for your cupcakes.
With a little creativity, you can craft delicious, naturally-colored treats.
Can I Substitute the Cream Cheese Frosting?
You can absolutely substitute the cream cheese frosting!
There are lots of delicious alternatives to try, like buttercream, whipped cream, or even a simple dusting of powdered sugar.
Each option will give your cupcakes a unique flavor and texture.
Just be sure to choose a frosting that complements the overall taste and theme of your dessert.
Have fun experimenting until you find the perfect topping that fits your vision.
Is It Safe to Serve These to Children?
Yes, it's generally safe to serve these cupcakes to children.
The cream cheese frosting isn't necessary for food safety, so you can substitute it with another frosting or topping that's more child-friendly, like a simple buttercream or fruit-based glaze.
Just be mindful of any potential allergies or dietary restrictions your young guests may have.
With a few tweaks, these can make a fun and festive treat for kids' parties or events.