Dive into the shadowy history of Witch's Fingers Breadsticks, an eerie Halloween treat with roots in ancient European witchcraft. These spooky breadsticks were once believed to possess mystical powers, but now they're enjoyed for their unique appearance and texture. The recipe combines classic breadstick ingredients with a haunting twist, perfect for festive gatherings. You'll learn how to craft these bony, gnarled fingers, from preparing the dough to shaping and baking them to a golden-brown perfection. Top them off with a buttery crust and Parmesan cheese for a savory, indulgent treat that's sure to enchant your guests. Keep reading to uncover the full spellbinding details. As you sink your teeth into these bewitching breadsticks, you’ll experience a satisfying crunch followed by a soft, chewy center. The eerie appearance of the Witch’s Fingers Breadsticks is sure to be a conversation starter at any Halloween gathering. Keep reading to learn how to make bone breadsticks that are not only delicious but also a spooky addition to your Halloween spread. With just a few simple ingredients and some kitchen magic, you’ll be able to conjure up a batch of these tantalizing treats in no time.
Key Takeaways
- Witch's Fingers Breadsticks originate from ancient European witchcraft culinary traditions, believed to possess mystical powers and used in rituals and spellcasting.
- The eerie appearance of the breadsticks mimics gnarled, bony fingers channeling dark energies, transitioning from occult items to popular Halloween treats.
- The simple preparation process involves shaping the dough into finger-like shapes, creating knuckle indentations, and baking until golden brown.
- Brushing the breadsticks with melted butter and sprinkling freshly grated Parmesan cheese enhances the texture and taste, resulting in a savory, salty, and indulgent Halloween treat.
- The breadsticks can be presented on a platter to resemble a witch's hand, accompanied by a small bowl of marinara sauce as a "dipping cauldron" for a haunting culinary experience.
History
Originating from the ancient culinary traditions of European witchcraft, Witch's Fingers Breadsticks were once believed to possess mystical powers, often incorporated into rituals and spellcasting ceremonies.
These eerie-looking breadsticks, shaped like gnarled, bony fingers, were thought to channel the dark energies of the occult, lending an air of mystery and intrigue to any gathering.
Over time, the superstitions surrounding Witch's Fingers Breadsticks faded, and they transitioned from esoteric occult items to beloved Halloween treats.
Today, these savory snacks are enjoyed for their unique appearance and satisfying texture, rather than any supernatural associations.
While the origins may be steeped in witchcraft lore, Witch's Fingers Breadsticks have become a popular and accessible way to add a touch of spooky fun to parties, gatherings, and holiday celebrations.
Recipe
Witch's Fingers Breadsticks are a fun and spooky twist on classic breadsticks. These savory treats are perfect for Halloween parties or adding a touch of whimsy to any meal. With their eerie finger-like shape and golden-brown color, they're sure to delight both kids and adults alike.
Additionally, creating a budget for your Halloween treats can help manage your expenses and ensure you have enough for all the fun activities, making it easier to enjoy the season without financial stress. Creating a personal budget can help you plan for festive events.
These Witch's Fingers Breadsticks are easy to make and require minimal effort. The dough comes together quickly, and the shaping process is simple, making them an ideal project for the whole family to enjoy.
Ingredients:
- 2 cups all-purpose flour
- 1 teaspoon salt
- 1 teaspoon baking powder
- 1 tablespoon sugar
- 1 cup warm water
- 2 tablespoons olive oil
- 1 egg, beaten
- Coarse salt for sprinkling
Instructions:
In a large bowl, combine the flour, salt, baking powder, and sugar. Add the warm water and olive oil, and mix until a soft dough forms. Knead the dough for a few minutes until smooth and elastic. Cover the dough and let it rest for 30 minutes.
Preheat the oven to 375°F (190°C). Line a baking sheet with parchment paper.
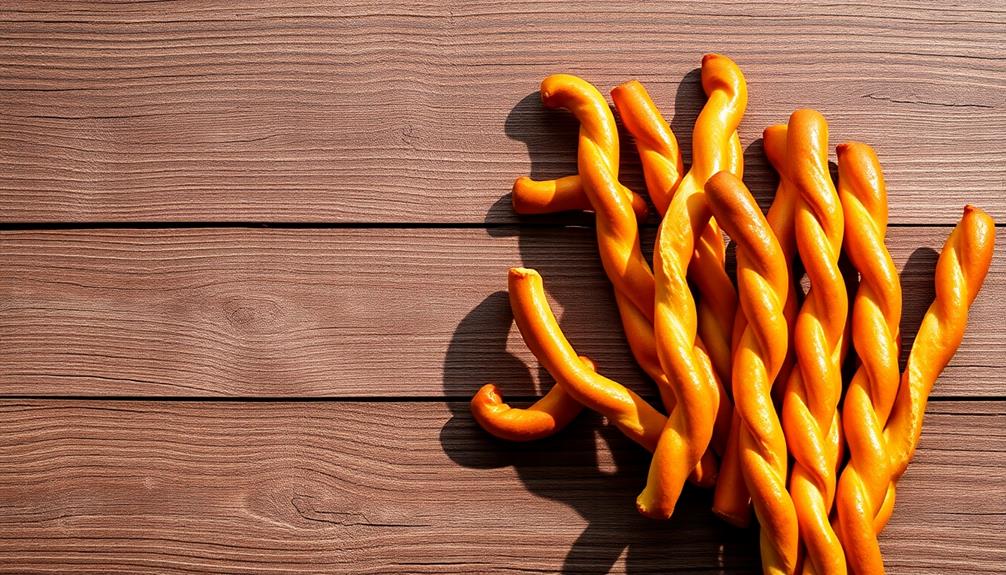
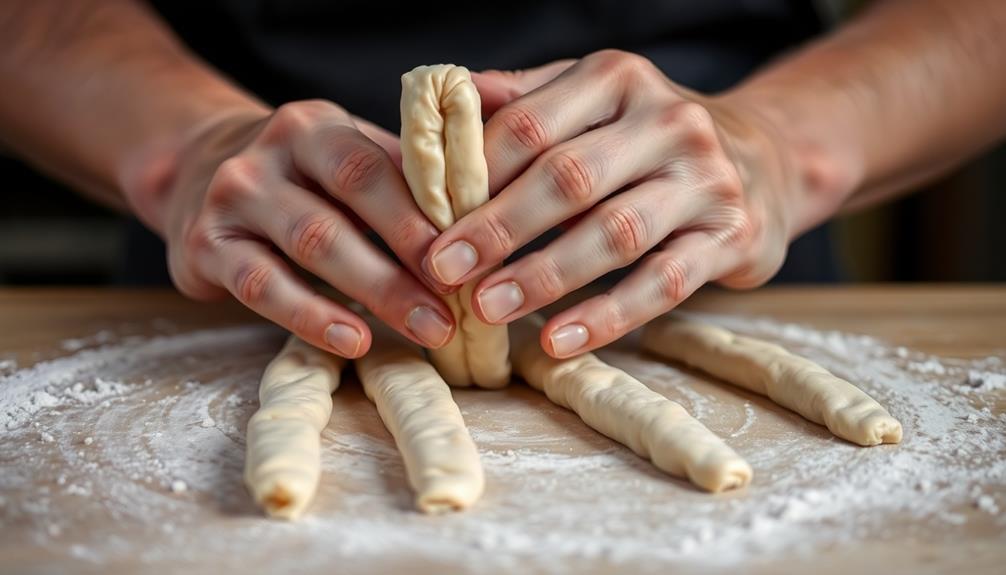
Divide the dough into 12 equal pieces. Roll each piece into a long, thin "finger" shape, tapered at the ends. Arrange the shaped breadsticks on the prepared baking sheet. Brush the tops with the beaten egg and sprinkle with coarse salt.
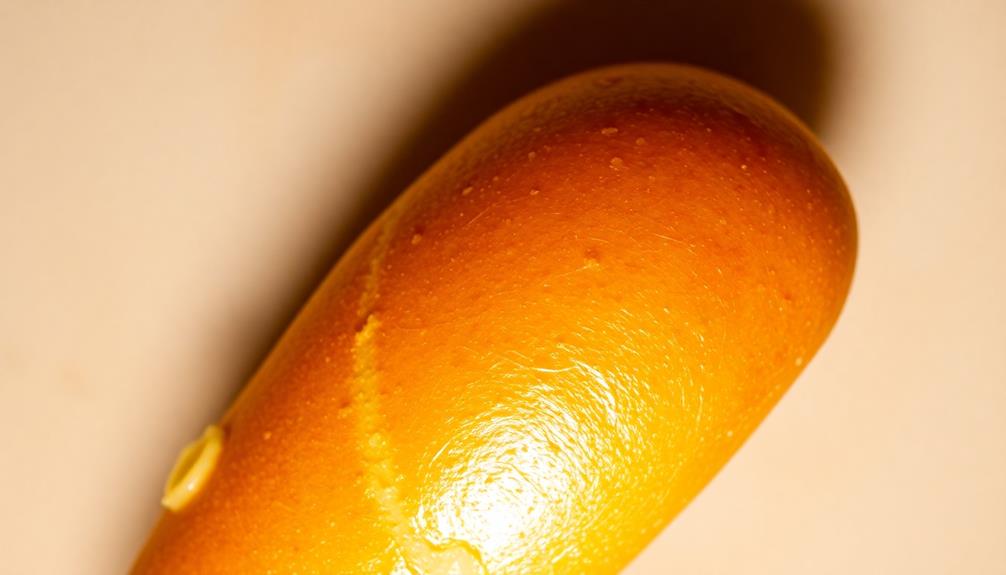
Bake for 18-20 minutes, or until the Witch's Fingers are golden brown. Serve warm and enjoy the spooky delight!
Tips:
- For an extra spooky touch, you can use a knife to make small indentations along the breadsticks to resemble knuckles.
- Experiment with different seasonings, such as garlic powder, paprika, or Italian herbs, to customize the flavor.
- Serve the Witch's Fingers Breadsticks with a creepy dipping sauce, like a spicy marinara or a ghostly white dip.
Cooking Steps
First, prepare the dough according to the recipe, ensuring it's well-kneaded for a perfect texture.
For a fun twist, consider serving these alongside a scoop of Birthday Cake Ice Cream for a festive touch.
Next, roll the dough into finger shapes to create the witch's fingers.
Then, bake the breadsticks at 400°F for 15 minutes.
Afterward, brush them with melted butter and sprinkle with Parmesan cheese for a savory, spooky treat.
Step 1. Prepare Dough According to Recipe
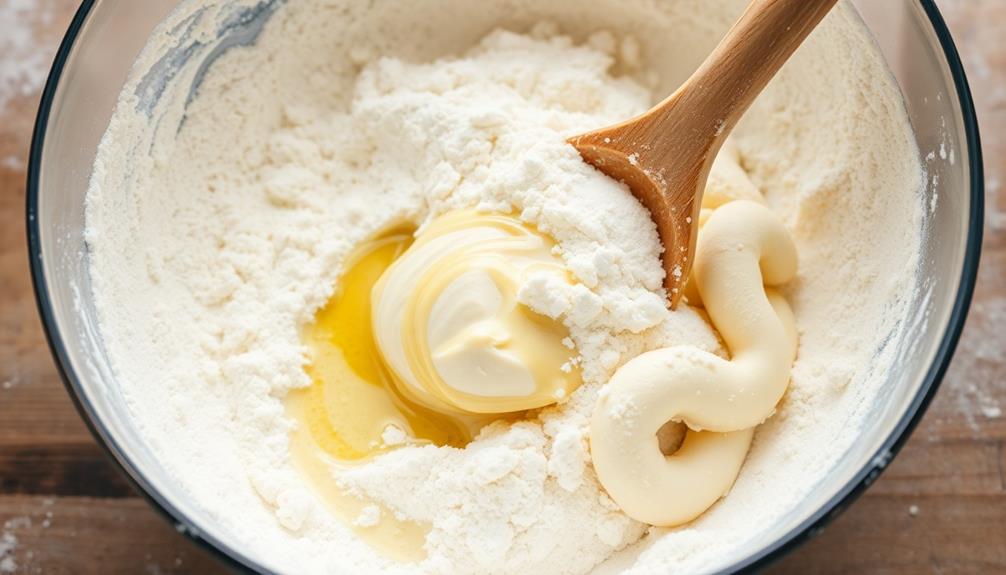
Begin by gathering the necessary ingredients for the dough, which include flour, yeast, salt, and warm water. For added flavor and richness, consider incorporating a bit of butter adds flavor and moisture into the dough when mixing the ingredients.
In a large mixing bowl, combine the flour and yeast, then add the salt. Gradually pour in the warm water, mixing the ingredients together until a shaggy dough forms. Knead the dough on a lightly floured surface for about 5 minutes, or until it becomes smooth and elastic.
Place the dough in a greased bowl, cover it with a clean towel, and let it rise for 30-45 minutes, or until it has doubled in size. Once the dough has risen, punch it down to release any air bubbles.
Divide the dough into 8 equal pieces and roll each one into a long, thin "finger" shape. Arrange the shaped dough on a parchment-lined baking sheet, leaving some space between each piece. Your witch's fingers breadsticks are now ready to bake according to the recipe instructions.
Step 2. Roll Dough Into Finger Shapes
Once the dough has risen, gently punch it down to release any air bubbles.
Dividing the dough into 12 equal pieces not only helps in creating uniform breadsticks but also ensures even baking, which is essential for achieving the perfect texture.
Roll each piece between your palms to form a finger-like shape, tapering one end to create the "nail." For a unique touch, you could even experiment with different brewing methods to pair with your spooky treats.
Arrange the dough fingers on a parchment-lined baking sheet, leaving a bit of space between them. Use a small knife or toothpick to gently create knuckle indentations along the length of each finger.
Brush the dough lightly with the beaten egg, then sprinkle with coarse salt or other desired seasonings.
Bake the witch's fingers at 375°F (190°C) for 15-18 minutes, until golden brown. Keep a close eye to prevent over-browning.
Allow the breadsticks to cool slightly before serving. Serve these spooky, savory treats as an appetizer or alongside soups and stews for a fun and festive Halloween presentation.
Step 3. Bake at 400°F for 15 Minutes

Preheat your oven to 400°F (200°C). This temperature will ensure your Witch's Fingers Breadsticks bake to a delightful golden-brown hue and promote a clean cooking environment, which is essential for maintaining a healthy home.
Once the oven is preheated, place the rolled dough fingers onto a parchment-lined baking sheet, spacing them about an inch apart. This will allow the breadsticks to bake evenly without crowding. Regular cleaning of your kitchen surfaces can also help minimize allergens and pollutants, contributing to better indoor air quality, which enhances overall well-being health and wellness benefits.
Slide the baking sheet into the hot oven and set a timer for 15 minutes. As the Witch's Fingers bake, you'll notice the dough puffing up and the edges turning crisp. The tantalizing aroma of the garlic and herbs will start to fill your kitchen, making your mouth water in anticipation.
When the timer goes off, check the breadsticks. They should be a perfect light golden brown. If they need a bit more time, leave them in the oven for an additional 2-3 minutes, keeping a close eye to prevent burning.
Once baked to perfection, remove the tray from the oven and let the Witch's Fingers cool for a few minutes before serving.
Step 4. Brush With Melted Butter
After the Witch's Fingers Breadsticks have finished baking, you'll want to brush them with melted butter. This simple step adds a delightful shine and rich flavor to the crisp, golden breadsticks.
Start by melting a few tablespoons of unsalted butter in a small saucepan over low heat, being careful not to let it burn. Using unsalted butter is preferred for cooking, as it allows you to control the salt levels.
Once the butter is fully melted, use a pastry brush to gently coat each breadstick, ensuring every nook and cranny is covered. The warm butter will soak into the bread, creating a mouthwatering, buttery crust.
Be sure to brush the tops, sides, and undersides for maximum coverage. This extra touch of butter takes the Witch's Fingers Breadsticks to the next level, elevating their texture and taste.
Allow the buttered breadsticks to rest for a minute or two before serving warm. Your guests will love the shiny, buttery finish on these spooky and delicious Halloween treats.
Step 5. Sprinkle With Parmesan Cheese
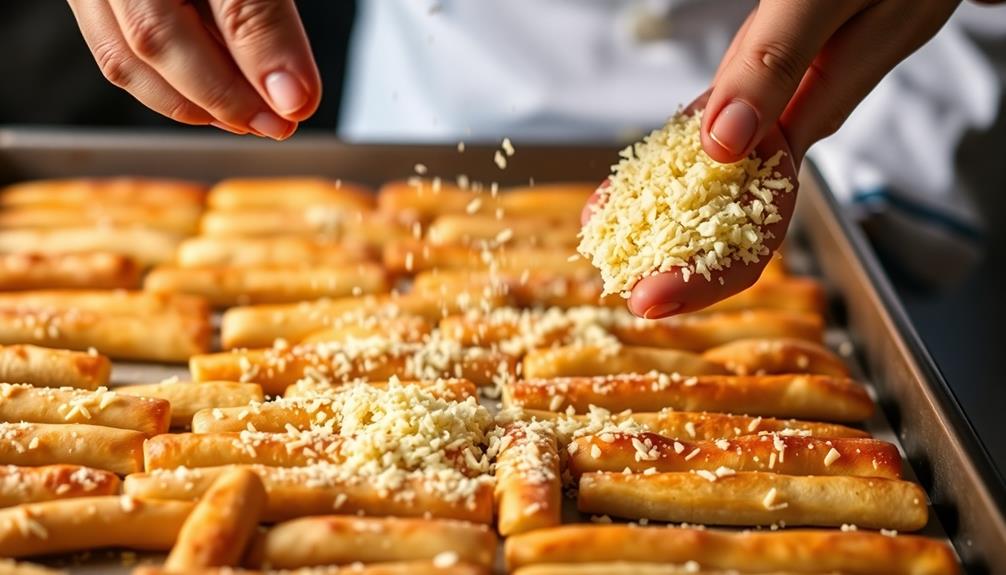
To add another layer of flavour and texture, sprinkle a generous amount of freshly grated Parmesan cheese over the buttered Witch's Fingers Breadsticks. The sharp, salty taste of the Parmesan will complement the savory butter and create a delightful contrast in every bite.
Use a microplane or fine-grater to shred the Parmesan, ensuring it's evenly distributed across the breadsticks. The finely grated cheese will cling to the butter, creating a crispy, cheesy coating that adds both visual appeal and a satisfying crunch.
Don't be shy with the Parmesan – a liberal sprinkling will enhance the overall flavour profile and make these breadsticks truly irresistible. The cheese will melt slightly, binding to the breadsticks and creating a harmonious blend of buttery, cheesy goodness.
Serve the Witch's Fingers Breadsticks warm, allowing the Parmesan to showcase its full flavour potential. Enjoy the perfect balance of savory, salty, and indulgent in every delectable piece.
Final Thoughts
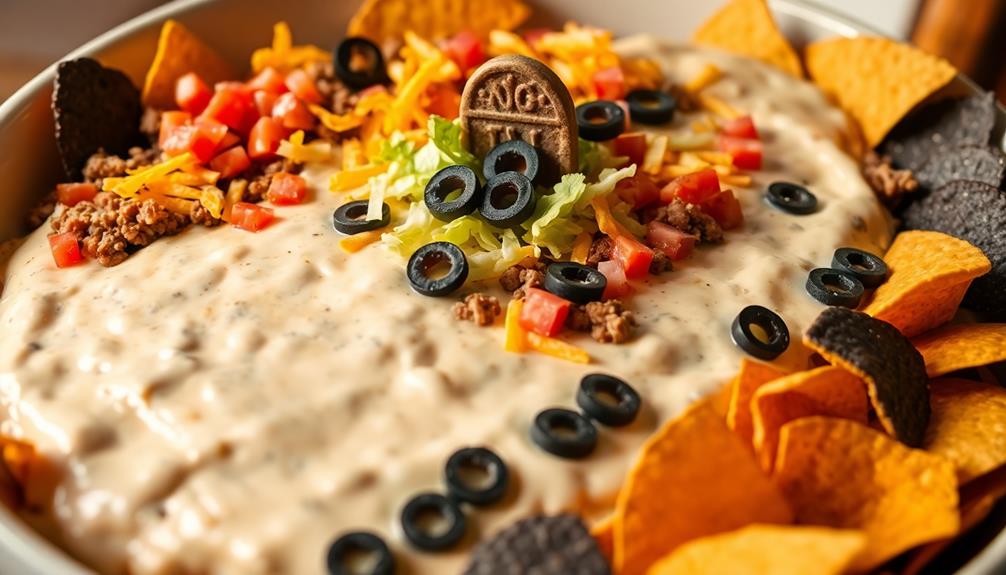
As you prepare to serve these spooky Witch's Fingers Breadsticks, don't forget to have fun with the presentation. Arrange the breadsticks on a platter or tray, positioning them to resemble a witch's hand with the fingers reaching out.
You can even add a small bowl of marinara sauce on the side, suggesting a "dipping cauldron." Consider incorporating other Halloween-themed elements, like a black napkin or a spooky tablecloth, to really set the mood.
The key is to embrace the playful and eerie nature of this recipe. Remember, the goal is to delight your guests with these creative and delicious Witch's Fingers Breadsticks.
Have fun experimenting with the presentation, and don't be afraid to get a little spooky. Enjoy the process, and your guests are sure to be impressed by your haunting culinary creation.
Frequently Asked Questions
Can I Use Pre-Made Dough Instead of Homemade?
Yes, you can absolutely use pre-made dough instead of homemade!
This is a great time-saving option, especially if you're short on time or don't feel like going through the process of making dough from scratch.
Pre-made dough can work just as well, and you'll still get delicious, homemade-tasting results.
Just be sure to follow the instructions on the package and adjust baking time as needed.
With pre-made dough, you can whip up your recipe in no time.
How Long Do the Breadsticks Stay Fresh?
How long your breadsticks stay fresh really depends on how you store them.
If you keep them at room temperature in an airtight container, they'll usually last for 3-4 days.
For longer storage, you can freeze them for up to 2 months. Just make sure to thaw them at room temperature before reheating.
No matter how you store them, freshly baked breadsticks are always best, so try to enjoy them as soon as possible for maximum flavor and texture.
Can I Freeze the Raw Dough for Later Use?
Absolutely! Freezing raw dough is a great way to preserve it for later use.
Simply shape the dough into your desired form, wrap it tightly in plastic or freezer-safe bags, and pop it in the freezer.
When you're ready to use it, let the dough thaw in the refrigerator overnight before baking. This allows you to enjoy fresh-baked goods anytime, without the hassle of mixing up a new batch each time.
Just be sure to label the dough with the date to keep track of its freshness.
Can I Substitute Other Spices for the Seasoning?
Yes, you can definitely substitute other spices for the seasoning!
The great thing about making your own breadsticks is that you can customize the flavors to your liking.
Try swapping in garlic powder, oregano, rosemary, or even a pinch of cayenne for a spicy kick.
Just be sure to start with smaller amounts and adjust to taste.
The options are endless – get creative and make the breadsticks your own!
Are There Any Gluten-Free or Vegan Options Available?
Absolutely! There are plenty of gluten-free and vegan options available for you to try.
You can swap out the traditional flour with gluten-free alternatives like almond, coconut, or rice flour. As for the dairy, use plant-based milk and butter substitutes to make your breadsticks vegan-friendly.
Just be sure to adjust the recipe accordingly and keep an eye on the baking time. With a few simple substitutions, you can enjoy a delicious, allergy-friendly version of this tasty treat.