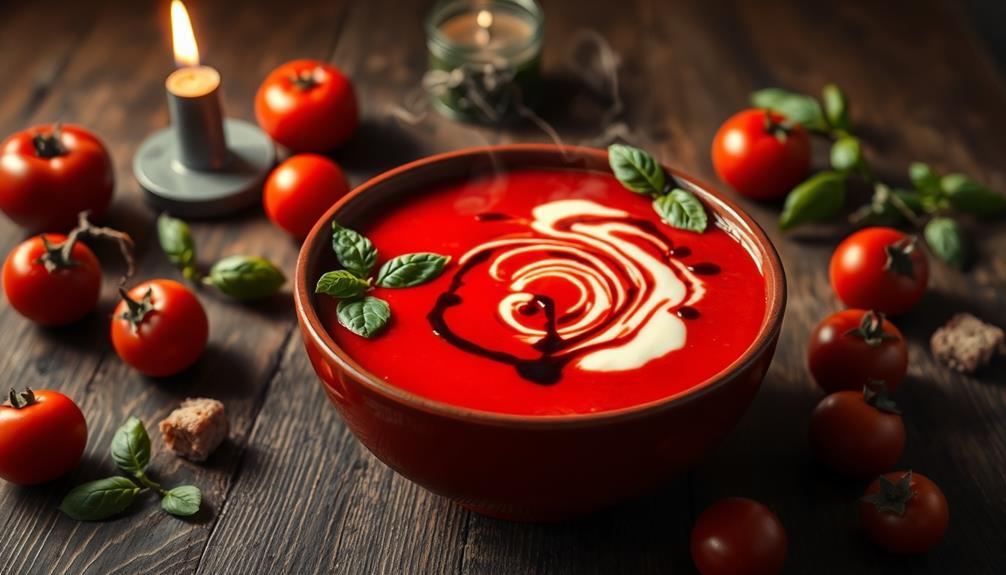
Bring some spooky magic to your kitchen with Witch's Hat Calzones! This fun twist on the classic Italian calzone dates back to the 16th-century Amalfi region, featuring a savory or sweet filling wrapped in a flaky, golden-brown crust shaped like a witch's hat. You'll love the balance of crispy texture and warm, gooey center. The recipe is easy to prepare, with steps for dough making, filling assembly, and the unique shaping technique. Experiment with different fillings to create your own signature version – the possibilities are endless! Keep reading to unlock more delightful details about this enchanting dish.
Key Takeaways
- Witch's Hat Calzones are a unique Italian dish with a history dating back to the 16th century, known for their distinctive pointed shape inspired by witches' hats.
- The recipe combines a crispy, flaky dough with a variety of savory or sweet fillings, making it a perfect Halloween or spooky occasion treat.
- The preparation process involves dough making, filling assembly, and carefully shaping the calzones into the iconic witch's hat form.
- Baking the calzones at 400°F for 20-25 minutes results in a golden brown, delicious final product with a balance of crispy crust and warm, gooey filling.
- The recipe offers versatility, allowing for experimentation with different fillings and flavors to create unique and personalized variations of the Witch's Hat Calzones.
History
According to historical records, the origins of the iconic "Witch's Hat Calzones" can be traced back to the 16th century. During this time, Italian bakers in the coastal villages of the Amalfi region experimented with folding dough into triangular shapes, inspired by the distinctive hats worn by local witches.
These early calzones were initially savory, filled with a variety of local cheeses and cured meats, reflecting the rich culinary traditions of the region. As the recipe spread throughout Italy and eventually made its way to the Americas, bakers began to experiment with sweet fillings, such as fruit preserves and chocolate, creating the diverse range of Witch's Hat Calzones we know and love today.
The unique shape not only evokes the mysterious allure of witchcraft but also allows for a perfect balance of crispy crust and warm, gooey filling in every bite, similar to how local roasters prioritize unique flavors.
Recipe
The Witch's Hat Calzones are a fun and festive twist on a classic Italian dish. These calzones are shaped like pointed witch's hats, perfect for Halloween or any spooky occasion. The combination of savory fillings and flaky dough creates a delightful texture and flavor that will have your guests asking for more.
For those looking to enhance their movie night experience while enjoying these calzones, pairing them with a good home theatre setup can create an unforgettable ambiance. Consider setting up a projector that supports high refresh rates for a cinema-like feel.
To make these enchanting calzones, you'll need to prepare the dough, assemble the fillings, and then shape them into the iconic witch's hat design. The process may take a bit of time and effort, but the result is sure to impress.
Ingredients:
- 2 cups all-purpose flour
- 1 teaspoon salt
- 1 teaspoon baking powder
- 1/2 cup warm water
- 2 tablespoons olive oil
- 1 cup ricotta cheese
- 1 cup shredded mozzarella cheese
- 1/2 cup grated Parmesan cheese
- 1 egg, beaten
- 1 teaspoon dried oregano
- 1/2 teaspoon garlic powder
- Marinara sauce, for serving (optional)
Instructions:
In a large mixing bowl, combine the flour, salt, and baking powder. Slowly add the warm water and olive oil, and knead the dough until it becomes smooth and elastic. Cover the dough and let it rest for 30 minutes.
Preheat your oven to 400°F (200°C).
In a separate bowl, mix together the ricotta, mozzarella, Parmesan, egg, oregano, and garlic powder until well combined. Roll out the dough into a large rectangle, about 1/4-inch thick. Cut the dough into 8 equal triangles.
Place a spoonful of the cheese mixture onto the center of each triangle. Fold the dough over to form a half-moon shape and pinch the edges to seal. Gently pull the pointed ends of the calzones to create the witch's hat shape.
Place the shaped calzones on a baking sheet lined with parchment paper. Bake for 20-25 minutes, or until the dough is golden brown and the filling is bubbly.
Serve the Witch's Hat Calzones warm, with marinara sauce on the side for dipping, if desired.
Cooking Steps
Roll out that dough 'til it's nice and thin, ensuring an even texture for the perfect calzone.
For a delightful twist, consider adding a touch of compound butter recipes to your filling for enhanced flavor.
Pile on the filling, then fold that calzone into a triangle.
Crimp and seal the edges before popping it in the oven to bake until golden brown.
Step 1. Roll Out Dough
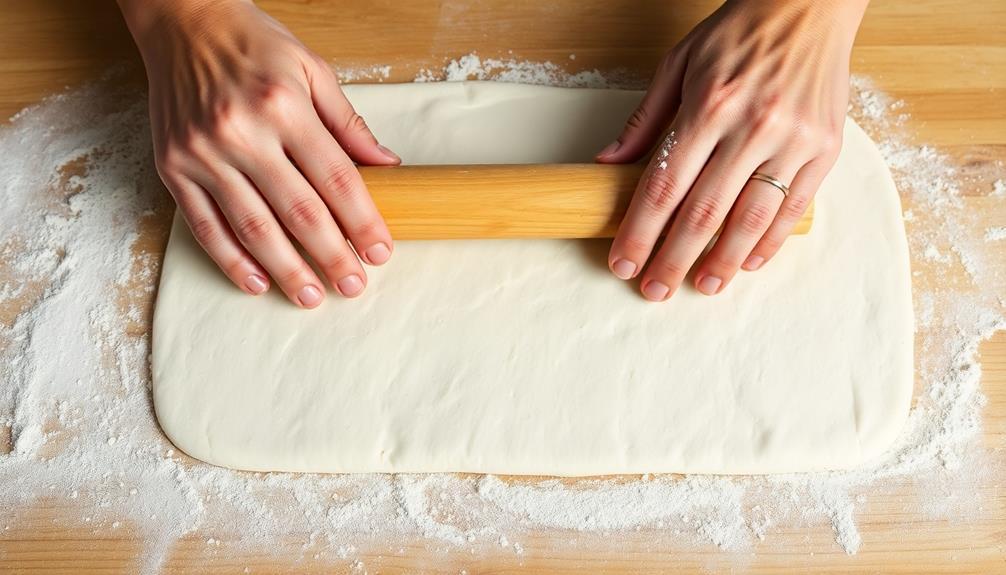
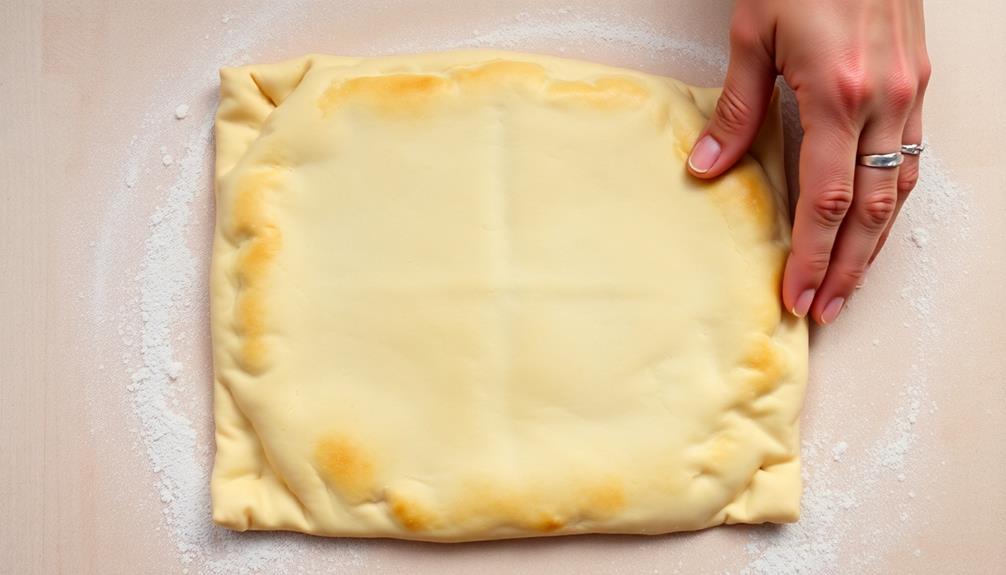
Grab your rolling pin and let's get to work on that dough. Lightly flour your clean, flat surface, then place the dough ball in the center. Using even strokes, begin rolling the dough outward, turning it a quarter-turn after each roll to ensure an evenly thin and round shape.
As you roll, apply gentle pressure to create a consistent thickness, aiming for about 1/8 inch. Be careful not to overwork the dough, as this can make it tough.
Understanding the mechanics of dough rolling can enhance your baking experience and ensure perfect results.
Once your dough is rolled out, use a circular cookie cutter or the rim of a bowl to cut out perfect circles. Carefully transfer these rounds to a parchment-lined baking sheet, spacing them apart to prevent sticking.
Gather up the remaining dough scraps, gently re-roll, and cut out more circles until you've used all the dough. Now your dough is ready to be filled and shaped into those spooky witch's hat calzones!
Step 2. Add Filling

On the rolled-out dough circles, place a spoonful of your desired filling in the center. Whether you prefer a classic pepperoni and cheese combination or a vegetarian medley of sautéed veggies, the choice is yours.
For an added twist, consider complementing your filling with a side of sugar-free vanilla ice cream for a delightful dessert pairing. Carefully fold the dough over the filling, creating a half-moon shape, and press the edges to seal them tightly. This will prevent any delicious contents from spilling out during baking.
For a festive witch's hat appearance, gently stretch one side of the calzone to create a pointed tip. Use a sharp knife to make a small slit in the top, allowing steam to escape and giving your calzones an authentic, spooky look.
Be mindful not to overstuff the dough, as this can cause it to burst open. With the filling securely enclosed, your witch's hat calzones are now ready for the oven.
Step 3. Fold Calzone Into Triangle Shape
Folding the calzones into their signature triangle shape is a simple yet essential step. Gently place the filled calzone onto a clean, lightly floured surface. Using your hands, fold one side of the calzone over the filling, then fold the opposite side over it, creating a neat triangle. Pinch and press the edges to seal, ensuring a secure shape that will hold its form during baking.
The triangle fold not only gives the calzones their distinctive witch's hat appearance but also helps to prevent leakage during cooking. As the calzones bake, the sealed edges will puff up, locking in the delicious filling.
Be gentle yet firm in your folding motions, taking care not to overstuff or tear the dough. With a little practice, you'll be able to fold these calzones quickly and effortlessly, producing a professional-looking result every time.
Step 4. Crimp and Seal the Edges
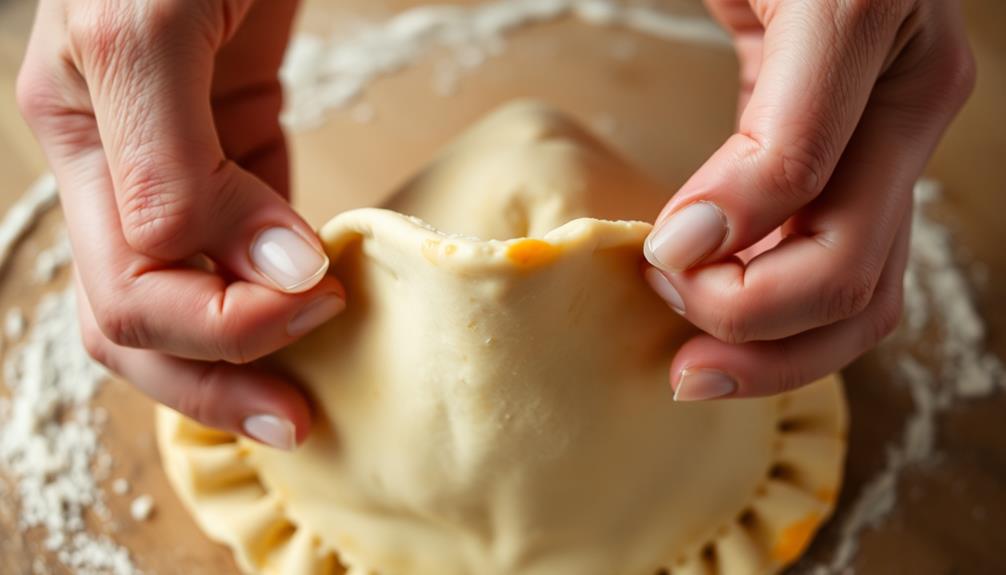
Now that the calzones are shaped into their signature triangle form, how do you ensure the edges are properly crimped and sealed?
It's all about creating a tight, secure seal to lock in all those delicious fillings. Start by lightly wetting the edges of the calzone with a bit of water – this helps the dough adhere better as you crimp.
Then, using your thumb and forefinger, gently pinch and fold the dough over onto itself, creating a series of tight pleats or folds along the edge. Apply gentle pressure as you go to really seal everything in.
You can also use a fork to press and crimp the edges, creating a decorative pattern. The key is to avoid any gaps or openings, which could cause leaks during baking.
Once the edges are crimped, you can brush the calzones with an egg wash for a beautiful golden sheen.
Now they're ready for the oven – your witch's hat calzones will bake up perfectly sealed and ready to enjoy.
Step 5. Bake Until Golden Brown
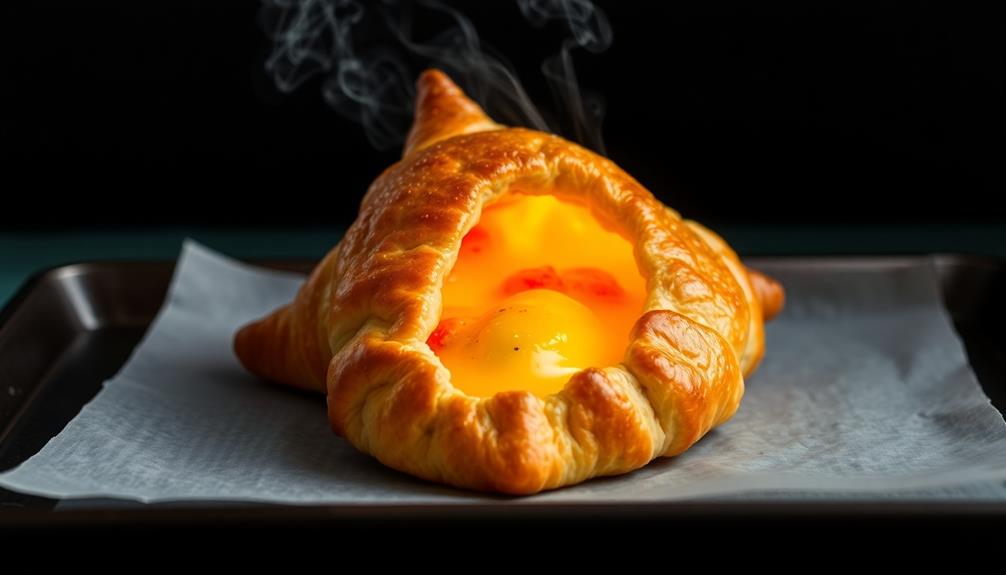
Once the calzones are crimped and sealed, it's time to bake them until they're a beautiful golden brown. Preheat your oven to 400°F (200°C).
Line a baking sheet with parchment paper or a silicone baking mat to prevent sticking. Carefully transfer the prepared calzones to the prepared baking sheet, making sure they're spaced out evenly. This will allow the hot air to circulate around each one, ensuring even cooking.
Bake the calzones for 18-22 minutes, keeping a close eye on them. The dough should puff up and turn a lovely golden-brown color. If you notice some areas browning faster than others, you can rotate the baking sheet halfway through the cooking time.
Once the calzones are done, remove them from the oven and let them cool for a few minutes before serving. This short resting period allows the fillings to set, making them easier to handle and enjoy.
Serve the baked calzones hot, and don't forget to savor the delightful flavors and crispy texture.
Final Thoughts
As you've now learned the steps to create these whimsical Witch's Hat Calzones, don't hesitate to experiment with different fillings or toppings to suit your personal preferences.
The beauty of this recipe lies in its versatility – you can get creative with various ingredients and flavors to make it your own. For instance, try swapping the traditional marinara sauce for a pesto or a creamy alfredo.
You could also venture into the realm of vegetarian or meat-based fillings, depending on your dietary needs and tastes. The key is to have fun and unleash your inner culinary witch or wizard! If you’re feeling adventurous, you might want to try experimenting with unique flavor combinations. For example, a vegetarian filling could incorporate roasted butternut squash and black beans, while a meat-based filling could feature a spicy chorizo and potato mix. And if you’re in the mood for a hearty and warming dish, you can’t go wrong with a witch’s brew chili recipe, filled with an assortment of spices and hearty ingredients that will leave your taste buds dancing in delight. The possibilities are endless when it comes to filling your empanadas, so don’t be afraid to get creative and add your own personal touch to each batch. Another option for a unique and flavorful filling is to experiment with Asian-inspired flavors, such as a teriyaki tofu and vegetable filling or a sweet and spicy Korean BBQ beef filling. You could even take inspiration from the traditional flavors of different regions, such as a Mediterranean-inspired filling with feta cheese, spinach, and olives. And if you’re in the mood for a cozy and comforting meal, the witch’s brew chili recipe is sure to hit the spot with its rich and savory flavors. No matter what filling you choose, making empanadas is a great way to express your creativity in the kitchen and share delicious, homemade food with family and friends.
With a little imagination and the right techniques, you can conjure up delightful variations of these whimsical calzones to impress your friends and family.
Frequently Asked Questions
Are Witch's Hat Calzones Suitable for Vegetarians?
Vegetarians can absolutely enjoy calzones! As long as the filling doesn't contain any meat, dairy, or other animal products, you're good to go.
Just look for a veggie-friendly calzone recipe or order one at a restaurant that offers a vegetarian option.
The great thing about calzones is their versatility – you can stuff them with all sorts of delicious, plant-based ingredients.
Can I Substitute Pumpkin Puree for the Squash Filling?
You can absolutely substitute pumpkin puree for the squash filling in your recipe!
Pumpkin will work great as a tasty and nutritious alternative. It has a similar sweet, earthy flavor that'll pair perfectly with the other calzone ingredients.
Just make sure to use the same amount of pumpkin puree as you'd the squash. This swap will give your calzones a lovely fall-inspired twist.
Give it a try – I think you'll love the results!
How Do I Ensure the Calzone Dough Is Evenly Cooked?
To ensure your calzone dough is evenly cooked, there are a few simple tips.
First, roll the dough out thin and evenly, so there aren't any thick spots that will take longer to bake.
Next, make sure to seal the edges tightly to prevent leaks.
Then, use a fork to prick the top of the calzone several times, allowing steam to escape and promote even cooking.
Finally, rotate the calzone halfway through baking to ensure all sides get a chance to brown.
With these techniques, you'll get perfectly cooked calzones every time!
Can I Freeze the Unbaked Calzones for Later Use?
Yes, you can absolutely freeze unbaked calzones for later use!
The key is to make sure they're properly prepared and packaged before freezing. First, assemble the calzones as usual, but don't bake them.
Place them on a baking sheet, ensuring they don't touch, and freeze until solid. Then, transfer the frozen calzones to an airtight container or freezer bag.
When you're ready to enjoy them, simply bake the frozen calzones as directed in your recipe. This makes for a super convenient, homemade meal anytime.
How Long Do the Baked Calzones Typically Last?
Baked calzones generally last 3-4 days when stored in the fridge.
To extend their shelf life, you can freeze them for up to 2-3 months. Just make sure to let them cool completely before wrapping tightly in foil or plastic wrap.
When you're ready to enjoy, thaw in the fridge overnight and then reheat in the oven until piping hot.
This way, you can enjoy fresh-tasting calzones long after they've been baked.