Witch's hat cookies have bewitched bakers and Halloween enthusiasts for centuries. These charming treats, designed to resemble pointed witches' hats, evolved from 17th-century witchcraft practices. With a simple sugar cookie base, you can customize them with various colors and decorations, infusing your creativity into a delightful baking project. Whether you're an experienced baker or a beginner, these cookies offer a fun, whimsical way to celebrate the spookiest season. From the baking process to the decorating tips, you'll discover how to craft these festive treats that are sure to impress your friends and family. And if you keep reading, you'll uncover even more captivating details about witch's hat cookies.
Key Takeaways
- Witch's hat cookies are a popular Halloween treat that originated in the 17th century and are designed to resemble the pointed hats worn by witches.
- These cookies are made from a simple sugar cookie dough, which can be customized with various colors and decorations to create a whimsical and spooky appearance.
- The baking process involves cutting the dough into triangular shapes to form the pointed hat, and baking until lightly browned to achieve the desired texture.
- Decorating the cookies with buttercream icing, edible glitter, or sprinkles can add an extra layer of creativity and personal expression.
- Witch's hat cookies are a versatile treat that can be enjoyed at Halloween parties, bake sales, or as homemade gifts, and can be adapted to suit different seasonal themes.
History
The witch's hat cookie has a long and fascinating history, dating back to the 17th century. During this time, the practice of witchcraft was widespread, and these whimsical treats became associated with the mystical practices of the era.
The distinctive pointed shape of the cookie was designed to mimic the iconic hats worn by witches, adding an air of mystique and intrigue to the baking process. As with any tradition, understanding the implications of various practices can enhance the experience, similar to how IRA inheritance rules can affect financial planning for families.
As the centuries passed, the witch's hat cookie evolved, with bakers experimenting with different recipes and decorative elements. Today, these cookies remain a beloved part of the Halloween tradition, delighting both children and adults with their spooky yet charming appearance.
Whether you're hosting a Halloween party or simply indulging in a seasonal treat, baking witch's hat cookies is a fun and easy way to incorporate a touch of the supernatural into your culinary adventures.
Recipe
Witch's Hat Cookies are a delightful and whimsical Halloween treat that will delight both children and adults. These festive cookies are easy to make and can be customized with different colors and decorations to suit your spooky style.
When indulging in treats like these, it's important to remember that moderation is key, especially since baked goods can add up in calories and sugar health issues to consider.
The key to creating the perfect Witch's Hat Cookies is to start with a simple sugar cookie dough and then transform it into the iconic witch's hat shape. With a few simple steps, you'll have a batch of these charming cookies ready to share with your friends and family.
Ingredients:
- 2 cups all-purpose flour
- 1/2 teaspoon baking powder
- 1/4 teaspoon salt
- 1 cup unsalted butter, softened
- 1 cup granulated sugar
- 1 egg
- 1 teaspoon vanilla extract
- Chocolate chips or other decorations (optional)
Instructions:
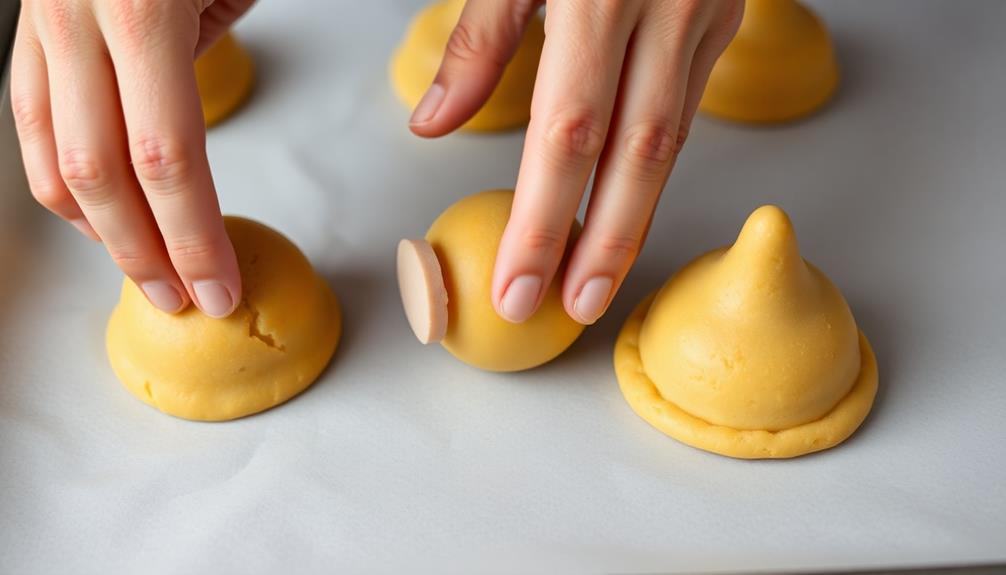
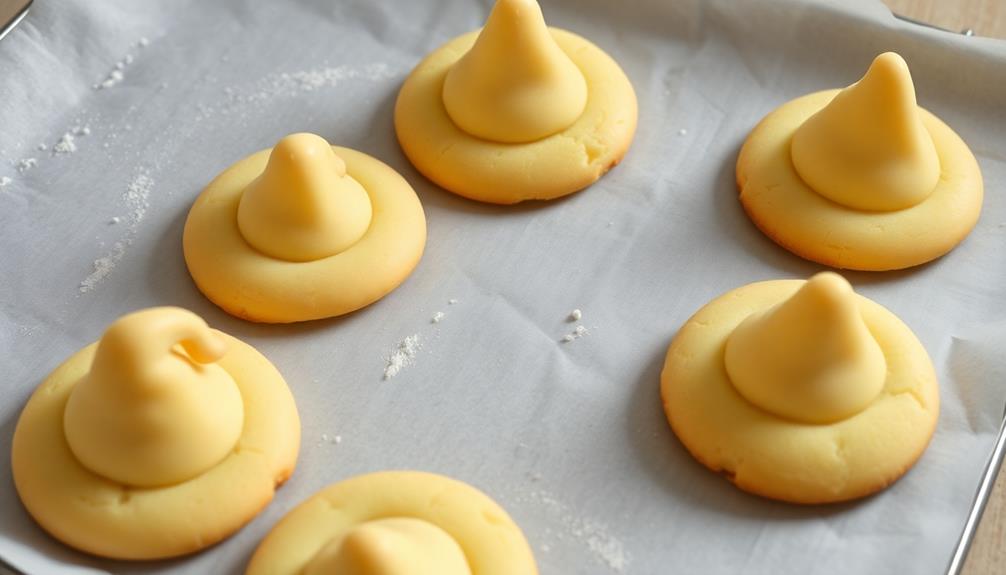
Roll the sugar cookie dough into 1-inch balls and place them on a parchment-lined baking sheet. Using the back of a spoon or a small cup, gently press down on the center of each ball to create a small indent.
Bake the cookies at 350°F for 8-10 minutes, or until they're lightly golden. Allow the cookies to cool completely on the baking sheet before decorating.
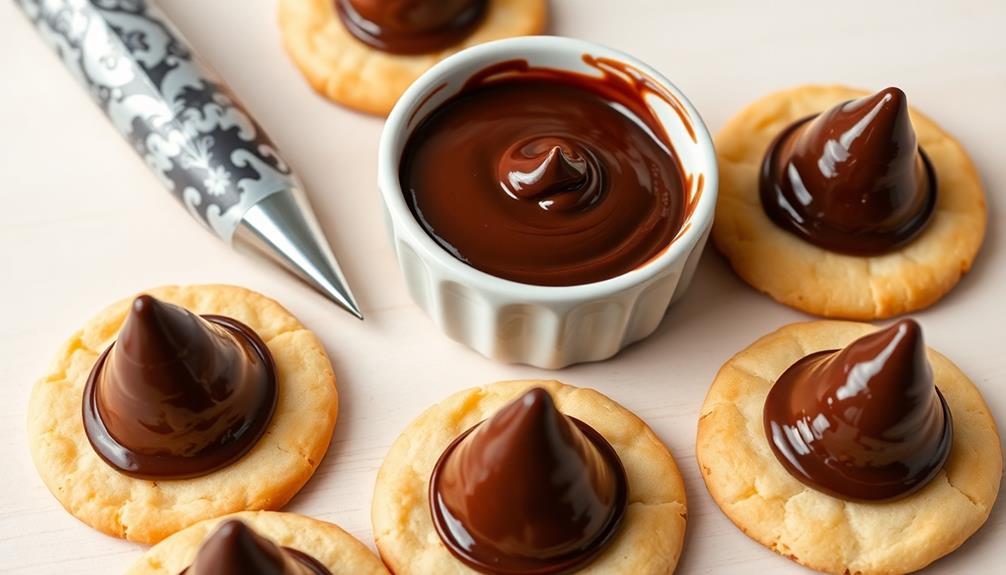
To create the witch's hat shape, melt a small amount of chocolate and use it to "glue" a chocolate chip or other decoration to the top of each cookie, creating the pointed hat.
Let the chocolate set completely before serving. Enjoy your spooky and delicious Witch's Hat Cookies!
Cooking Steps
To start, you'll need to gather your ingredients and equipment.
Consider adding a festive touch by using cookie cutters shaped like iconic Halloween symbols, such as bats or pumpkins, to complement your witch's hat cookies.
Once you've got everything ready, roll out the dough and cut it into fun witch hat shapes.
Finally, bake the cookies until they're lightly browned, then let your creativity shine by decorating them with icing.
For more creative ideas, check out unique costume inspirations.
Step 1. Gather Ingredients and Equipment
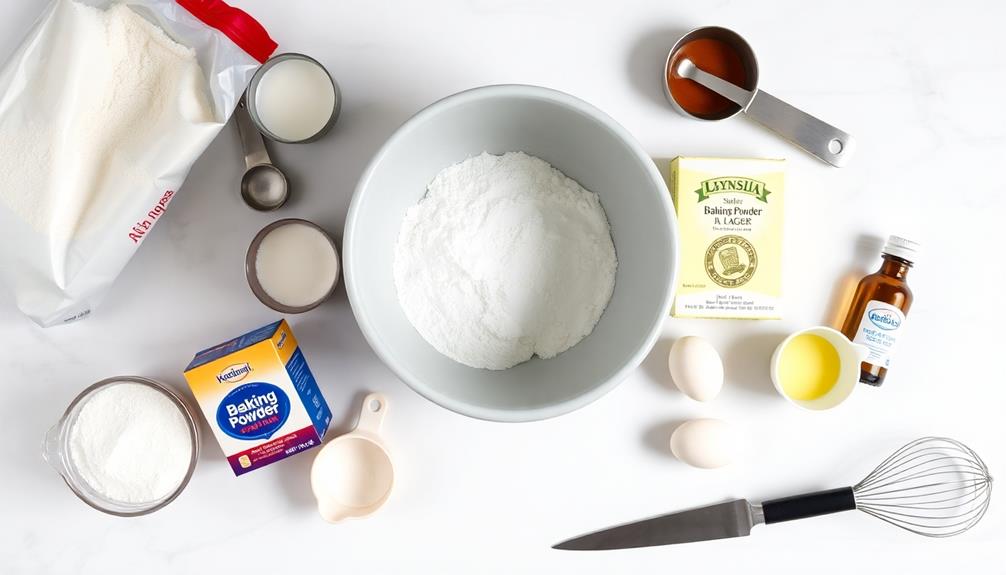
Gather your mixing bowl, a hand or stand mixer, a baking sheet, and parchment paper. You'll need all-purpose flour, baking powder, salt, unsalted butter, granulated sugar, an egg, and vanilla extract to create these delightful Witch's Hat Cookies.
These cookies can be a fun addition to your Halloween festivities, similar to the playful nature of Dirt Cups that are perfect for themed events.
Preheat your oven to 375°F (190°C) and line the baking sheet with parchment paper. In a medium bowl, whisk together the flour, baking powder, and salt.
In a separate large bowl, beat the butter and sugar with a mixer until light and fluffy. Beat in the egg and vanilla until well combined. Gradually add the dry ingredients to the wet ingredients, mixing until a dough forms. Cover the dough and chill for 30 minutes.
Once chilled, use a small cookie scoop to portion the dough into 1-inch balls. Arrange them on the prepared baking sheet, spacing them about 2 inches apart. Bake for 10-12 minutes, or until the cookies are lightly golden.
Allow them to cool on the baking sheet for 5 minutes before transferring to a wire rack to cool completely.
Step 2. Roll Out Dough

After the dough has chilled, the real magic begins. Lightly flour your work surface and rolling pin. Gently roll out the dough to about 1/4-inch thickness, being careful not to overwork it. This step is crucial for achieving the perfect shape and texture of your witch's hat cookies.
For a delightful treat, consider serving these cookies alongside Flavorful Appetizers to create an inviting snack spread.
Use a sharp knife or cookie cutter to cut out the hat shapes, making sure to transfer them carefully to a parchment-lined baking sheet. Gather the remaining dough, re-roll it, and continue cutting out shapes until you've used it all up. Remember to space the cookies a few inches apart on the baking sheet to allow for spreading.
Now you're ready to bake your witch's hats. Keep a close eye on them in the oven, as the thin dough can brown quickly. Once they're golden and fragrant, let the cookies cool on the baking sheet for a few minutes before transferring them to a wire rack to cool completely.
Get ready to bring your spooky creations to life!
Step 3. Cut Dough Into Shapes
With the dough chilled, it's time to start cutting out the shapes for your witch's hat cookies. Lightly flour your work surface and rolling pin to prevent the dough from sticking. Gently roll out the dough to about 1/4-inch thickness, being careful not to overwork it.
Using a sharp knife or cookie cutters, begin cutting out the witch's hat shapes from the dough. For a classic look, use a triangular cookie cutter to create the hats. Carefully transfer the cut-out shapes to a parchment-lined baking sheet, spacing them about an inch apart.
If you don't have a specific hat-shaped cutter, you can use a knife to cut out the triangular shapes freehand. Just be mindful of maintaining an even thickness and consistent size for even baking.
Gather the remaining dough scraps, gently knead them together, and re-roll to cut out more shapes. Continue this process until all the dough has been used.
Step 4. Bake Cookies Until Lightly Browned
Preheat your oven to 350°F (175°C) and line a baking sheet with parchment paper.
Once your dough is cut into the spooky witch's hat shapes, it's time to bake them to perfection. Gently transfer the shaped cookies onto the prepared baking sheet, making sure to space them out evenly. This will allow the cookies to bake evenly and prevent them from spreading too much.
Bake the cookies for 10-12 minutes, or until they're lightly golden around the edges. Keep a close eye on them, as oven temperatures can vary.
The cookies should still be soft in the center when you remove them from the oven, as they'll continue to firm up as they cool. Allow the cookies to cool on the baking sheet for a few minutes before transferring them to a wire rack to cool completely.
Once cooled, your bewitching witch's hat cookies are ready to be decorated and enjoyed!
Step 5. Decorate Cookies With Icing
Once your witch's hat cookies have cooled completely, it's time to bring them to life with a bit of icing.
Start by preparing a simple buttercream icing – just mix together softened butter, powdered sugar, and a splash of vanilla extract until it's smooth and creamy.
Next, divide the icing into two parts. Use one portion to pipe a thick band around the base of the cookie, creating the "brim" of the witch's hat. Smooth it out with a knife or offset spatula, ensuring a clean, even edge.
For the second portion, thin it out with a bit of milk or cream until it's the perfect consistency for drizzling. Carefully drizzle this icing over the top of the cookie, mimicking the look of a pointed hat.
Final Thoughts
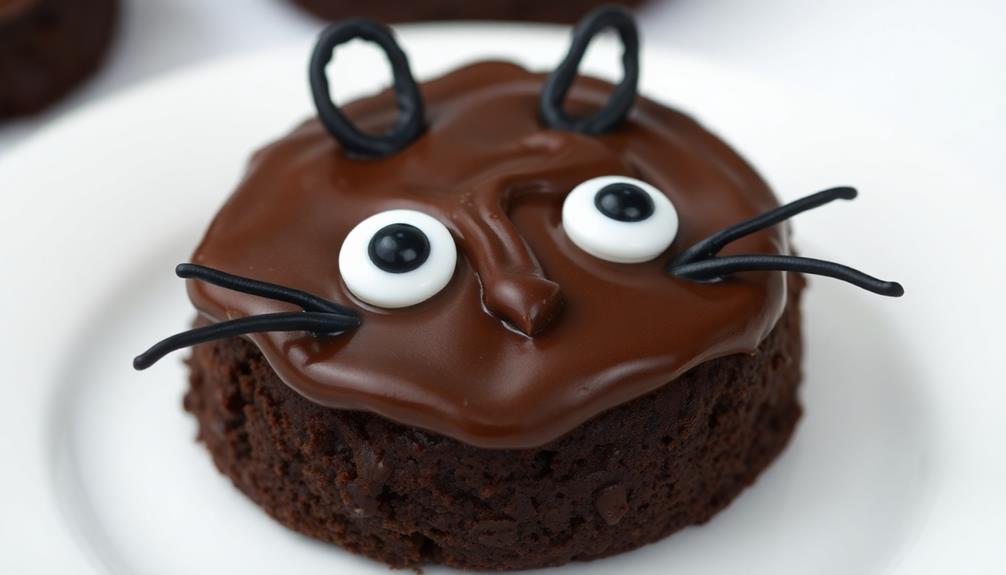
Ultimately, these Witch's Hat Cookies are a delightful and whimsical treat that capture the spirit of Halloween. With their charming appearance and delicious flavor, these cookies are sure to be a hit at any Halloween gathering. The combination of the chocolate cookie base and spooky meringue topping makes for a delightful and impressive dessert that is as fun to eat as it is to look at. If you’re looking to add a bit of magic to your Halloween menu, consider trying out this spooky meringue cookie recipe.
They're a fun project to undertake, whether you're baking them for a party, a bake sale, or simply to enjoy at home. The vibrant colors and creative design make them a standout dessert that's sure to impress your friends and family.
Once you've mastered the technique, you can let your creativity shine by experimenting with different color combinations or even adding a touch of sparkle. The possibilities are endless!
These cookies also make wonderful homemade gifts, perfect for sharing the Halloween cheer.
Frequently Asked Questions
Can I Use a Different Type of Chocolate for the Cookies?
Absolutely! You can definitely use a different type of chocolate for the cookies.
Dark, milk, or white chocolate would all work well. Just keep in mind that the flavor profile and melting properties may vary, so you may need to adjust the recipe slightly.
Experiment with different chocolate types to find the one that best suits your taste preferences. Have fun exploring new flavor combinations and let your creativity shine!
How Long Do the Cookies Last After Baking?
The shelf life of your homemade cookies can vary depending on the ingredients and storage conditions.
Generally, they'll stay fresh for 3-5 days when stored in an airtight container at room temperature.
For maximum freshness, you can extend their lifespan by refrigerating them, which will keep them tasty for up to a week.
Just be sure to let them come to room temperature before serving for the best texture and flavor.
Can I Make the Dough Ahead of Time?
You can absolutely make the dough ahead of time!
Preparing the dough in advance is a great way to save time and have delicious homemade cookies ready to go. Simply mix up the ingredients, shape the dough, and refrigerate or freeze it until you're ready to bake.
This allows you to do the prep work when you have the time, then just slice, bake, and enjoy fresh cookies whenever you'd like.
Just be sure to thaw frozen dough before baking.
Are the Cookies Suitable for Vegans or Those With Dietary Restrictions?
To address your current question, the cookies aren't inherently suitable for vegans or those with dietary restrictions.
The traditional recipe likely includes ingredients like butter, eggs, and potentially milk-based components.
However, with some simple substitutions, you can easily adapt the recipe to accommodate vegan and specialized diets.
For instance, you could use plant-based butter or oil, flax or chia seeds as egg replacers, and non-dairy milk alternatives.
Adapting the recipe to suit your dietary needs is quite straightforward and will ensure everyone can enjoy these delightful cookies.
Can I Freeze the Baked Cookies for Later Use?
Absolutely! You can easily freeze baked cookies for later use.
Just let them cool completely, then place them in an airtight container or freezer bag.
They'll keep for up to 3 months in the freezer.
When you're ready to enjoy them, simply thaw at room temperature or pop them in the oven for a few minutes to warm them up.
Frozen cookies are a great way to have homemade treats on hand anytime!