Witch's Broom Cheese Straws take you on a delightful journey to the enchanting world of Halloween. These savory snacks feature a flaky, buttery dough twisted into whimsical broom shapes, infused with the bold flavor of sharp cheddar cheese. Originating in 16th century France, this recipe has evolved over time, refining the dough and cheese blend to achieve the iconic look and taste. Bake them to golden-brown perfection, then enjoy the satisfying crunch and mouthwatering cheesy goodness. Perfect for Halloween celebrations or any occasion, these festive treats are sure to delight both children and adults. Read on to uncover the full story behind this captivating creation.
Key Takeaways
- Witch's Broom Cheese Straws are a traditional French snack with origins dating back to the 16th century, featuring a broom-like shape and sharp cheddar cheese flavor.
- The recipe has evolved over time, with the modern version combining a flaky, buttery dough and grass-fed butter for a distinctive texture and appearance.
- The twisted, broom-like shape of the cheese straws adds visual appeal, making them a popular choice for Halloween celebrations and whimsical snacking.
- The cheese straws can be paired with dips and spreads to enhance the overall dining experience, appealing to both children and adults.
- The preparation process requires patience, but the end result is a delightful combination of fun and flavor that leaves a lasting impression on guests.
History
Many believe the origins of witch's broom cheese straws can be traced back to the 16th century, when French bakers first experimented with incorporating cheese into savory pastries.
These early iterations were likely inspired by the intricate shapes and textures found in traditional witch's brooms. The use of rich, flavorful ingredients like grass-fed butter has also contributed to the buttery, flaky texture that enhances the overall experience.
Over time, the recipe evolved, with bakers refining the dough and cheese blend to create the distinctive "broom" appearance and flavor we know today.
Recipe
Witch's Broom Cheese Straws are a delightful and whimsical treat perfect for Halloween celebrations or any time you want to add a touch of spooky magic to your snacking.
These savory pastry straws are made with a flaky, buttery dough and infused with the rich flavor of sharp cheddar cheese. For an extra twist, you might consider pairing these cheesy delights with essential oils for respiratory health to help clear your sinuses while you enjoy your treats.
The twisted, broom-like shape of these cheese straws adds a delightful visual element, making them a fun and eye-catching addition to any party spread. Whether served as a standalone snack or alongside your favorite dips and spreads, these Witch's Broom Cheese Straws are sure to delight both children and adults alike.
Ingredients:
- 2 cups all-purpose flour
- 1 teaspoon salt
- 1 cup unsalted butter, chilled and cubed
- 1 cup shredded sharp cheddar cheese
- 2-3 tablespoons ice water
Instructions:
In a large bowl, combine the flour and salt. Cut in the chilled butter until the mixture resembles coarse crumbs. Stir in the shredded cheddar cheese.
Add the ice water, one tablespoon at a time, until the dough just begins to come together. Shape the dough into a disk, wrap in plastic, and refrigerate for at least 30 minutes.
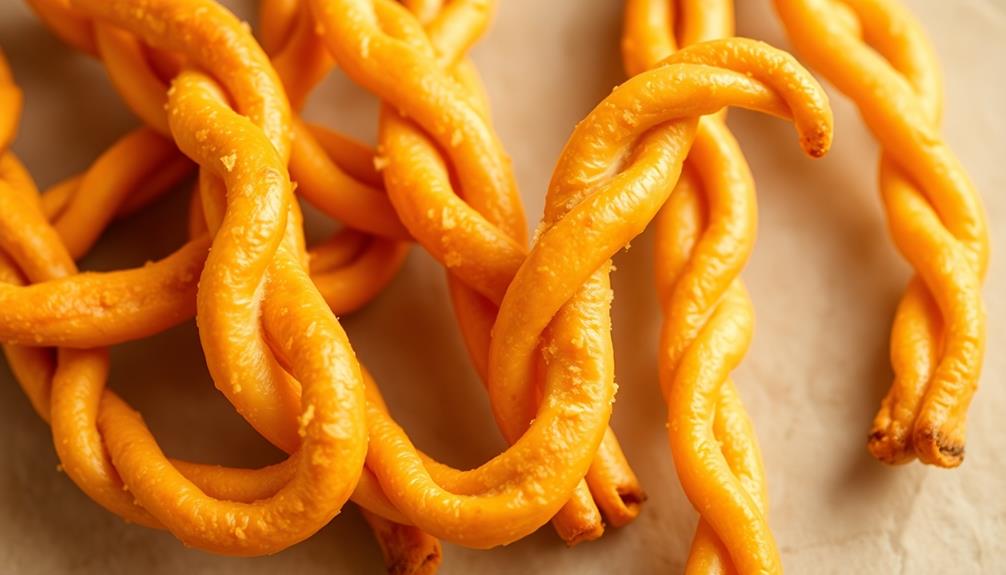
On a lightly floured surface, roll the dough out to a 1/4-inch thickness. Using a sharp knife or pizza cutter, cut the dough into long, thin strips, about 1/2-inch wide. Twist each strip into a spiral shape, mimicking the look of a witch's broom.
Place the twisted straws on a parchment-lined baking sheet, spacing them apart.
Bake the Witch's Broom Cheese Straws in a preheated 375°F oven for 12-15 minutes, or until golden brown and crispy. Allow the straws to cool on the baking sheet for a few minutes before serving.
Enjoy these delightful and whimsical treats with your friends and family.
Cooking Steps
First, preheat your oven to 375°F.
Next, add the shredded cheese to your prepared dough and knead it in until well combined.
Then, roll the dough into thin strips and twist them into spiral shapes, creating the iconic "witch's broom" look.
Step 1. Preheat Oven to 375°F
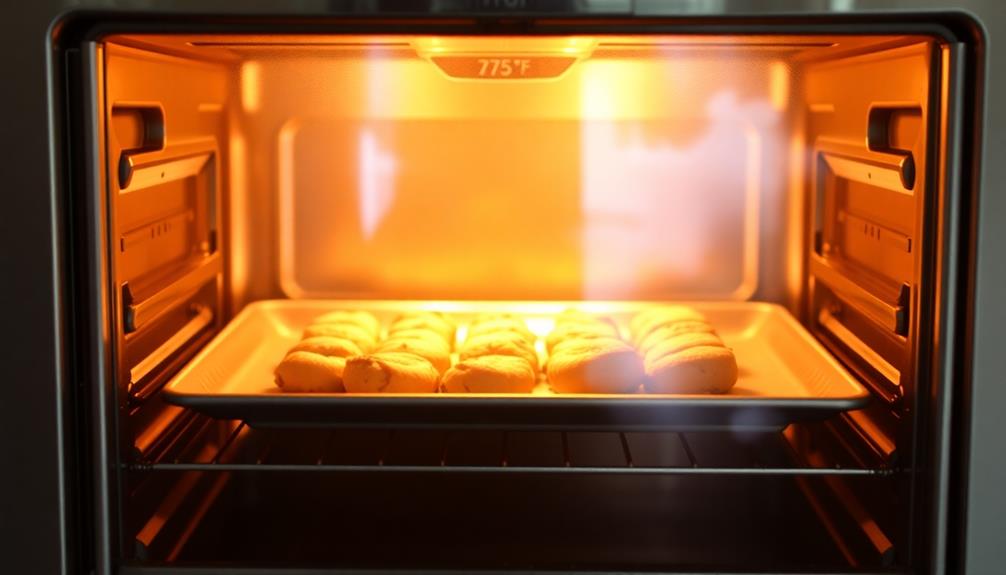
To begin the cooking process, preheat your oven to 375°F. This temperature is essential for ensuring your Witch's Broom Cheese Straws bake to perfection.
For an ideal baking environment, consider the impact of color accuracy in projectors on the overall visual experience, as even heat distribution is key in both cooking and creating stunning images.
Make sure your oven has reached this temperature before you begin assembling the ingredients. Preheating the oven allows it to evenly distribute the heat, creating the ideal environment for your cheese straws to rise and develop a golden-brown crust.
Once the oven has reached the desired temperature, you're ready to move on to the next step in the recipe. This preparatory step sets the stage for the rest of the cooking process, so don't skip it!
Taking the time to properly preheat the oven will result in delicious, flaky cheese straws that are sure to impress your guests.
With the oven ready, you can confidently proceed to the next stage of the recipe, confident that your Witch's Broom Cheese Straws will turn out beautifully.
Step 2. Add Shredded Cheese

After preheating the oven, you'll want to gather the shredded cheese. This is a crucial step, as the cheese is the star of the show in these Witch's Broom Cheese Straws.
You'll need about 2 cups of your favorite shredded cheese – cheddar, Parmesan, or a blend would all work wonderfully. Chia seeds, known for their nutritional power, can be a fantastic addition to your diet, offering fiber and protein that can complement your cheesy treat.
Take a moment to give the shredded cheese a gentle squeeze, ensuring it's not too tightly packed. This will help the cheese melt and ooze perfectly as the straws bake.
Once you've got your cheese ready, it's time to sprinkle it over the prepared dough. Distribute the cheese evenly, making sure to cover the entire surface.
As the straws bake, the cheese will melt, creating those delightful pockets of gooey, cheesy goodness. Don't be afraid to be generous with the cheese – these are called Witch's Broom Cheese Straws, after all!
Step 3. Roll Dough Into Thin Strips

With the cheese evenly distributed, it's time to start rolling the dough into those broom-like strips. As you engage in this creative process, remember that hands-on activities can enhance fine motor skills, much like how interactive learning toys support cognitive development in children.
Grab a small portion of the dough and roll it between your palms, creating a thin, elongated strip. Aim for a width of about 1/4 inch, ensuring the strips are uniform in size. As you roll, be gentle to avoid tearing the dough.
Gently transfer each strip onto the prepared baking sheet, arranging them in a parallel pattern to mimic the look of a witch's broom. Remember to leave a little space between the strips to allow for expansion during baking.
Continue this process until you've used up all the dough, creating a whimsical array of cheese-infused "broomsticks" on the sheet. With the dough shaped and ready, it's time to bake these enchanting Witch's Broom Cheese Straws to perfection.
Step 4. Twist Dough Into Spiral Shapes

Once you've rolled the dough into uniform strips, it's time to add a whimsical twist. Gently take each strip and begin twisting it into a spiral shape, coiling the dough around itself. As you twist, be mindful to maintain an even thickness throughout, ensuring your cheese straws bake evenly.
Don't worry if the spirals aren't perfectly symmetrical – the organic, slightly imperfect look is part of the charm.
Once you've twisted all the dough strips, arrange them on a parchment-lined baking sheet, leaving a bit of space between each one. This allows the cheese straws to expand and develop those delightful crispy edges as they bake.
Feel free to get creative and play with the tightness of the spirals, creating a variety of playful shapes and sizes.
With the dough now shaped into these enchanting spirals, your Witch's Broom Cheese Straws are ready for the oven. Bake until golden brown and irresistibly buttery, then serve warm to your delighted guests.
Step 5. Bake Until Golden Brown

Preheat your oven to 375°F (190°C). Prepare a baking sheet by lining it with parchment paper or a silicone baking mat. This will ensure your cheese straws don't stick to the pan and make for easy cleanup.
Once your oven is heated, carefully transfer the twisted dough shapes onto the prepared baking sheet, spacing them out evenly. Resist the urge to overcrowd, as this can cause the straws to bake unevenly.
Bake the cheese straws for 12-15 minutes, keeping a close eye on them. You're looking for a beautiful golden-brown color that indicates they're perfectly cooked. The aroma wafting through your kitchen will be simply irresistible.
When the time is up, remove the baking sheet from the oven. Allow the cheese straws to cool on the pan for a few minutes before transferring them to a wire rack. This will help them maintain their delightful crispy texture.
Final Thoughts
Overall, these witch's broom cheese straws make for a delightful and whimsical treat that's perfect for Halloween or any occasion. The unique shape and savory cheese flavor create a fun and visually striking snack that's sure to impress your guests.
While the preparation may require a bit of patience, the end result is well worth the effort. The crisp, golden-brown texture and the satisfying crunch make these cheese straws irresistible. They pair beautifully with a glass of wine or cider, adding a touch of spooky elegance to any gathering. For those looking to impress their guests with a delicious and unique treat, this cheesy appetizer recipe is the perfect choice. The combination of sharp cheddar and a hint of cayenne pepper creates a bold and irresistible flavor that is sure to be a hit. Whether enjoyed at a Halloween party or as a special treat for a cozy night in, these cheese straws are sure to be a crowd-pleaser.
Whether you're hosting a Halloween party or simply want to enjoy a playful homemade snack, these witch's broom cheese straws are a delightful choice that will have everyone feeling the spirit of the season.
Frequently Asked Questions
How Long Do the Cheese Straws Last?
Homemade cheese straws typically last 3-5 days when stored properly.
Keep them in an airtight container at room temperature, and they'll stay fresh and crisp.
The exact shelf life can vary depending on the ingredients and how you store them, but you can generally expect to enjoy these savory treats for about a week.
Just be sure to check for any signs of staleness or mold before indulging.
With proper storage, you can savor the cheesy goodness for several days.
Can the Recipe Be Made Gluten-Free?
Absolutely, you can make this recipe gluten-free!
Simply swap out the all-purpose flour for a high-quality gluten-free flour blend. Be sure to choose one that's designed for baking and contains xanthan gum to help mimic the structure of traditional flour.
With a few minor adjustments, you can enjoy the same delicious cheese straws without the gluten. Just follow the recipe as usual, and you'll have a tasty gluten-free treat in no time.
What Type of Cheese Works Best?
When it comes to cheese straws, you've got plenty of options to choose from. The best cheeses tend to be sharp, flavorful varieties that can hold their own in the recipe.
Cheddar, Parmesan, and Gruyère are all excellent choices, as they'll provide a delightful cheesy taste and a satisfying texture. Just be sure to grate or finely shred the cheese so it mixes in seamlessly with the other ingredients.
Experiment to find your personal favorite – the possibilities are endless!
Can the Cheese Straws Be Frozen?
Absolutely, you can freeze cheese straws!
In fact, it's a great way to have them on hand whenever a craving strikes. Just bake the straws as usual, let them cool completely, then pop them into an airtight container or freezer bag.
When you're ready to enjoy, simply thaw them at room temperature or give them a quick warm-up in the oven.
Frozen cheese straws will stay fresh for up to 3 months, so you can always have a tasty snack ready to go.
Is the Recipe Suitable for Vegetarians?
The recipe for these cheese straws should be suitable for vegetarians, as long as you use a vegetarian-friendly cheese.
Just be sure to check the label and confirm that the cheese doesn't contain any animal-derived rennet.
With a few simple substitutions, you can easily make this tasty snack work for your vegetarian friends and family.
The key is finding the right cheese that melts well and provides that delicious savory flavor you're looking for.