Did you know about 88% of beginners in mehndi courses found it very worthwhile? This fact shows a rising interest in learning henna art. In six days, these learners dive into vibrant colors, complex patterns, and deep cultural meanings. This article will show how you can start mastering mehndi, learn the basic skills, and unlock your artistic potential.
By practicing for one month, anyone can make stunning mehndi designs, no matter their starting point. With the right tools, good advice, and a bit of passion, you’ll go from novice to artist. You’ll be able to create beautiful mehndi designs. Imagine surprising your loved ones with your skills and sharing a tradition that combines art with cultural expressions. In no time, you’ll be creating professional mehndi designs that showcase your creativity and dedication. Your work will impress not only your friends and family but also potential clients who are looking for an artist to create stunning designs for special occasions. With practice and determination, your mehndi designs will be sought after for their beauty and intricacy.
Key Takeaways
- Start with simple patterns before progressing to intricate mehndi designs.
- Daily practice is essential for mastering henna artistry.
- Engaging with online courses provides access to valuable resources and community support.
- Customization using glitter and beads enhances the uniqueness of your designs.
- Participating in the community fosters connections with other mehndi artists for learning opportunities.
- Maintaining a portfolio of your work showcases your progression and creativity.
The Art of Mehndi: A Brief Overview
Mehndi art has been a beautiful body decoration for over 5000 years. It started in places like India, the Middle East, and Northern Africa. Here, people use henna to make amazing designs that mean joy and celebration. This practice is big in South Asian weddings and festivals. For example, in Chennai, brides decorate their hands and feet with mehndi before their weddings.
Now, mehndi is getting popular in many parts of the world. Countries like the United States, Canada, Europe, and Australia are enjoying it too. It’s become a fun way for people to express themselves. They use henna as a temporary tattoo and share their designs on places like Instagram.
To start with mehndi, you only need a few things. Get a henna mehndi cone, some plastic sheets, printed patterns, and tissues. It’s an easy art form that lets you be creative and connect with traditions.
Mehndi art is also good for the mind. It works like meditation, helping you feel calm and focused. Many communities now hold henna workshops. These bring people together, creating a peaceful and connected atmosphere.

Zenia 6 Pack 100% Natural Ready to Use Henna Paste Hair Color Hair Dye Cones Reddish Brown Color
- All-Natural Henna Paste: Pure, ready-to-use henna for hair coloring
- Convenient Ready-to-Use Cones: No mixing required, easy application
- Vibrant Reddish-Brown Color: Natural color with subtle red undertones
As an affiliate, we earn on qualifying purchases.
As an affiliate, we earn on qualifying purchases.
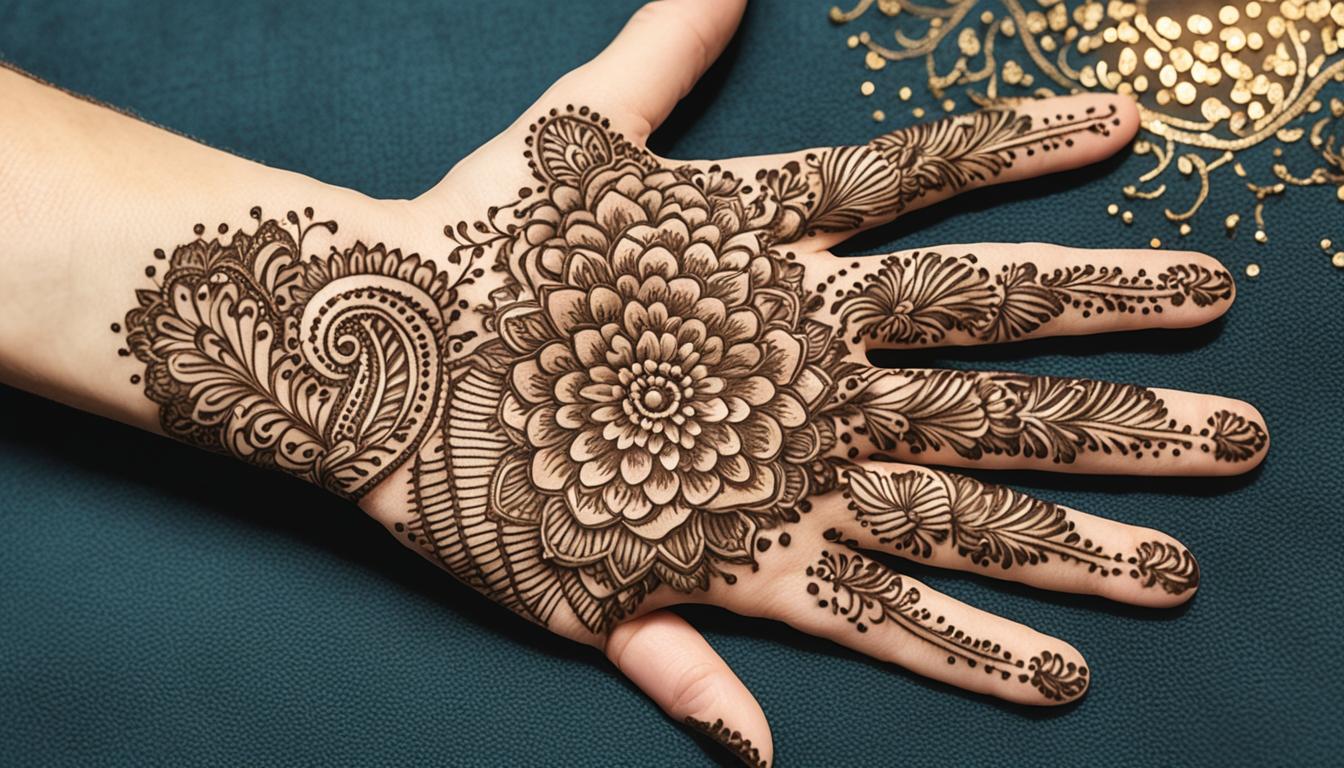
What is Mehndi and Its Cultural Significance?
Mehndi is a type of body art created with henna. It has deep cultural meanings in the Indian subcontinent, Middle East, and Africa. During rituals and celebrations, it symbolizes beauty, joy, and purification. For brides, it’s more than decoration. It marks their journey into marriage.

The cultural significance of mehndi stands out at weddings and festivals. About 78% of brides in the Indian subcontinent pick full hand designs. There’s been a 53% increase in bridal mehndi in the last ten years. It shows how important it is in wedding traditions.
Festivals like Eid and Diwali also show high mehndi use. These events often have designs that tell cultural stories or family histories. The beauty of henna reaches beyond its looks; it represents happiness and unity during special moments.
The mehndi industry earns about $350 million a year. Talented artists may get up to $700 for doing a bride’s mehndi. With artists’ earnings growing 25% yearly, it shows henna’s enduring appeal and value.
Lately, personal designs have become trendy, showing a 40% rise in demand for unique motifs. This change shows that mehndi art keeps evolving while staying true to its roots.
In summary, mehndi’s cultural significance is strong in both old and new rituals and celebrations. It’s a timeless practice that unites people. Whether in traditional events or modern weddings, henna adds beauty and meaning to the celebration.
Getting Started with Mehndi: Essential Tools and Materials
Starting your mehndi journey requires the best tools and materials. Knowing about the different mehndi tools is key for great designs. Also, getting your workspace ready is important for your creativity.
Types of Mehndi Cones and Their Use
Henna cones are the main tool for applying mehndi. You can choose between disposable and refillable cones. Disposable cones are good for occasional use and are budget-friendly. Refillable cones, however, are better for those who do mehndi often, as they make complex designs easier.
It’s important to practice with the henna cone to learn how to use it well. Cones let you apply small amounts of paste precisely, which is good for detailed designs. They are also a cheaper option compared to pre-mixed tubes or homemade paste, making them great for beginners.
Preparing Your Workspace for Mehndi Application
Preparing your workspace is a crucial step. Make sure it’s clean, well-lit, and free of clutter. This helps you do better work. Organize your mehndi tools to work more efficiently.
Here are some tips for setting up your space:
- Choose a surface that’s easy to clean.
- Keep paper towels or wipes nearby for spills or mistakes.
- Use a comfortable chair for focus during long sessions.
- Have extra henna cones within reach for quick changes.

With the proper tools and a well-organized workspace, you’re ready to start your henna art journey. Whether you’re dabbling occasionally or practicing frequently, enjoy making beautiful designs in this wonderful craft!
Choosing the Right Mehndi Designs as a Beginner
Starting in the mehndi world, picking the right designs can really make a difference. It’s key to go for beginner patterns that fit your skills. This helps you gain confidence as you learn.
Even easy designs can look stunning and are fun to do.
Easy Patterns to Start With
Beginning with simple designs opens many doors creatively. Here are some easy patterns to try:
- Simple floral motifs
- Basic paisley shapes
- Geometric designs
- Vine patterns
These starter designs are a soft launch into henna art. They let you get comfy with henna cones and how to use them. Practice will help you find your unique artistic voice.
Exploring Traditional vs. Modern Designs
Mehndi mixes traditional and modern designs in an exciting way. Old-school designs pack in intricate details and meaningful symbols. They tell stories of heritage and vary by location. Modern twists might add glitter, white henna, or gems, making classics new again.
| Design Type | Characteristics | Common Uses |
|---|---|---|
| Traditional Designs | Intricate, symbolic, detailed patterns | Weddings, cultural celebrations |
| Modern Designs | Simpler, stylish, often experimental | Casual events, fashion statements |
Knowing the difference between old and new styles lets you create what clicks with you. Feel free to mix both as you explore mehndi further.

Learning Techniques for Intricate Mehndi Designs
Mastering intricate mehndi designs starts with key techniques. These include line control, spacing, and filling patterns. As you practice, learn how your hand moves the mehndi. Adjusting pressure makes your lines thick or thin, as you wish.
Layering and shading are also crucial for complex designs. They add depth and make your work stand out. You’ll see how small changes can make a big difference.

Use practice pages to improve your skills. They help you see your progress over time. This task might seem hard, but with daily work and patience, it gets easier.
Creativity and trying new things are important in mehndi. Trust your artistic sense and try different styles. Each time you do, you’ll learn and grow. The more you practice, the better you’ll get at making unique and detailed designs.
How a Beginner Mastered Intricate Mehndi Designs in Just One Month
Learning mehndi in a month may sound tough, but it’s possible with daily practice. Consistency and a strong will to improve are key. By repeating designs and timing your sessions, you get better and more confident.
Daily Practice Routines
Focus on different mehndi aspects every day. Here’s how to start:
- Spend 15-20 minutes on basic patterns to build your skills.
- Pick a complex design and practice it on both hands to make cool variations.
- As you get better, try more difficult styles daily.
- Work on designs from your elbow to your fingertips to learn how they flow on different parts of the hand.
Resources and Online Courses for Skill Development
Good teaching can help you learn faster. Online mehndi classes are great resources. Beginners do well in courses by Tabassum Shamsi. These courses last six days, have many lessons, and most people rate them highly.
An amazing 88% of students love these courses. They teach you how to design for events like weddings or festivals. Adding sparkles and stones makes your mehndi unique.

Start this journey by taking care of your hands, especially before bed. Healthy practices keep your designs bright. With dedicated practice and the right courses, mastering mehndi designs is an exciting adventure.
| Course Name | Duration | Rating | Discount |
|---|---|---|---|
| Makeup Mastercourse | 6 Days | 4.4 | 44% Off |
| Professional Makeup Mastercourse | 6 Days | 4.4 | 71% Off |
| Mehendi B1 | 6 Days | 4.4 | 50% Off |
Common Mistakes Beginners Make in Mehndi Application
Starting with mehndi involves facing some challenges. Learning about these mistakes will greatly enhance your skill. A clear design is key to making beautiful patterns. Since using a simpler approach improves your design, it also builds your confidence.
How to Avoid Overcomplicating Designs
For beginners, simplicity often results in beauty. Aim for smooth, flowy lines instead of complicated patterns. These can get too complex. Check out these tips for beginners:
- Start with basic shapes and gradually add details.
- Limit the number of different designs in a single application.
- Use negative space effectively to enhance your design.
Tips for Working with Henna Paste Consistently
Mastering henna paste usage takes time. Consistent use helps in getting bright and long-lasting designs. Here are suggestions to better your experience:
- Store your henna paste in a cool place to prevent it from drying out.
- Make sure your paste is smooth and free of lumps for an easier application.
- Practice regularly to develop a steady hand and improve your technique.

Step-by-Step Guide to Creating Your First Intricate Design
Starting your first intricate mehndi design is thrilling. This guide will show you from choosing your design to applying it perfectly. You’ll have a great experience by following our clear steps.
Choosing Your Design and Gathering Materials
Pick a design that suits your level. Start with simple patterns to gain confidence. Then, you can move on to more complex ones. Make sure you have these items:
- Henna mehndi cone
- Flawless plastic sheet
- Printed design copy
- Tissue papers
- Plain paper
- Pencil
Having these items ready is key for a smooth mehndi application. This way, you won’t have to stop in the middle of your work.
Applying Mehndi: Tricks for Smooth Execution
Right hand position is important when applying mehndi. Keep a steady grip on the cone and press evenly for smooth lines. Try these tips for a better application:
- Practice on plain paper before your skin.
- Work in a bright area to see clearly.
- Keep the design going smoothly by not pausing too much.
- Let the mehndi dry fully for a deeper color.
The mehndi will darken over two to three days. With patience and practice, your designs will improve and can last weeks.

Incorporating Glitter and Beads for Added Flair
Adding glitter and beads to your mehndi designs can make them stand out. These decorations create a beautiful contrast with the natural henna color. Your artwork will look more vibrant and alive.
Choosing the right glitter color is important. Go for gold and silver for elegance. Bright colors can make your design fun and playful. Here’s how to use glitter:
- Choose a fine glitter to ensure it adheres properly without overpowering the intricate details of your mehndi.
- Apply a layer of adhesive gel where you want your glitter to stick, making sure to do this after the mehndi has dried for a stunning finish.
- Utilize a small brush for precision when applying your decorative beads or glitter, ensuring a well-defined look.
Decorative beads add another layer of beauty. They’re available in many sizes and colors. This lets you tailor your mehndi for any occasion or style. Here’s the best way to add beads:
- Choose beads that suit your design; larger beads work well on bold patterns, while smaller beads are perfect for intricate details.
- Attach beads while the mehndi is still tacky to ensure they stay in place.
- Experiment with arrangements, placing beads at the tips of your mehndi designs or within larger motifs for added intrigue.

Using glitter and beads brings endless creativity to your mehndi art. They turn simple designs into stunning works of art. They’re perfect for a bohemian look or a classic style.
Post-Application Care for Your Mehndi Designs
Proper care is key to keeping your mehndi designs looking their best. This care helps keep the colors bright and ensures the designs last longer. By following easy tips, you can make sure your mehndi stays beautiful for more time.
How to Maintain Vibrancy and Longevity of Your Designs
Looking after your mehndi is important after you apply it. This care can stop the colors from fading and keep the patterns looking sharp. Here are ways to keep your mehndi vibrant:
- Avoid washing your hands for at least 6 hours post-application. Water can dilute the dye, affecting the design’s richness.
- Apply natural oils—such as coconut or olive oil—on your mehndi designs. This practice enhances color depth and offers moisture that aids longevity.
- Steer clear of direct sunlight immediately after application, as UV rays may cause early fading.
- Choose loose clothing to avoid any rubbing against the design, which could smudge or wear it off.
- Patience is key. Allow the mehndi to dry naturally rather than using a hair dryer or fan.

| Tip | Description |
|---|---|
| Avoid Water | Do not wash hands for at least 6 hours after application. |
| Natural Oils | Apply simple oils to enhance color and moisture. |
| Avoid Sunlight | Keep mehndi away from direct sunlight to prevent fading. |
| Loose Clothing | Wear loose attire to prevent designs from rubbing. |
| Patience | Allow mehndi to dry naturally for the best results. |
By applying these tips, the beauty of your mehndi designs will last much longer. Caring correctly will keep your patterns bright and beautiful. It ensures they continue to impress.
Building Your Portfolio: Documenting Your Mehndi Journey
Starting your mehndi journey is exciting. Documenting your progress is key. It provides a visual history of your growth and lets you reflect on your techniques and choices. Building a portfolio is part of this journey.
It showcases your work to potential clients or followers. This can boost your artistic reputation and lead to new opportunities.
Why Sharing Your Work Matters
When you share your designs on social media for artists, it brings many benefits. You get feedback that helps you grow. You also connect with others who love mehndi, creating a supportive network.
Documenting your journey contributes to a wider artistic conversation. This not only helps you grow but also enriches others’ experiences.
Creating an Instagram Page Dedicated to Mehndi Art
Instagram is perfect for showing off your mehndi art. Start by picking a username that shows off your style. Make sure to post clear images that showcase your designs’ details. Use hashtags to reach more people and interact with your followers to create a community.
Here’s a simple table outlining some useful tips for creating a compelling Instagram page:
| Tip | Description |
|---|---|
| High-Quality Images | Always use clear photos that highlight your designs. |
| Consistent Posting | Develop a posting schedule to keep your audience engaged. |
| Engaging Captions | Write informative captions detailing your process, materials, or inspiration. |
| Hashtags | Utilize trending hashtags related to mehndi art for more visibility. |
| Interact with Community | Comment on and like other artists’ work to build connections. |

Community Engagement: Connecting with Other Mehndi Artists
Talking and connecting with other mehndi artists can help you learn and grow. When you meet other artists, you can exchange tips and get inspired. One good way to connect is joining online forums for mehndi art lovers. These forums let you meet artists from all over, helping you learn and get better at your art.
Going to workshops and events is another great way to meet other artists. At these events, you can practice your skills and learn from experts. You can also take free mehndi courses online. These courses teach you important techniques and design ideas, and connect you with artists who can inspire you.
You might want to start or join groups on social media that talk about mehndi art. These online communities are great for sharing resources, feedback, and new ideas. This can lead to working with others, trying new styles, and growing your art portfolio.

Getting help from a community is key to getting better at mehndi. Talking regularly with others in the field helps you face challenges, celebrate wins, and enjoy the journey together. Through networking and working together, you improve your skills and help make the mehndi artist community stronger and more supportive.
Conclusion
Learning mehndi is more than just making art; it’s a rewarding path that boosts your growth and creativity. In a month, you can learn to turn simple patterns into complex works of art.
Mehndi is special because anyone can try it, no matter where they’re from. If you practice regularly and avoid mistakes like pushing too hard or using bad henna, you’ll get better fast. Using organic henna powder helps a lot. It gives you bright, safe designs without bad chemicals.
Improving your mehndi skills also means joining a community of artists. This group can give you new ideas, encourage you, and help you learn more. Start this adventure with an open mind, and see how your mehndi art blooms!
FAQ
What is mehndi and how is it used in different cultures?
Mehndi, or henna, is an ancient art where designs are drawn on the skin with henna paste. It’s key in South Asian weddings and festivals like Eid and Diwali. These designs symbolize joy and are a form of artistic expression in various cultures.
What tools do I need to get started with mehndi?
You’ll need mehndi cones, which you can buy or make. Practice paper and a comfy place to work are important. Have cotton swabs on hand to fix any mistakes. This helps make applying mehndi easy and fun.
How can beginners choose suitable mehndi designs?
Start with simple patterns, such as basic flowers or shapes. This builds confidence. With more practice, try blending traditional and modern styles. This way, you find what you like without getting overwhelmed.
What techniques should I focus on to master intricate mehndi designs?
Focus on controlling your lines and the spacing between them. Learn to fill patterns neatly. Adding layers and shades makes designs complex. Practice these skills often to create beautiful, intricate art.
How often should I practice to improve my mehndi skills?
Practice every day to get better. Begin with simple designs then slowly try harder ones. Having a set practice time helps. This routine builds your skill in a month.
What common mistakes should beginners avoid while applying mehndi?
Keep designs simple at first; it brings out their beauty. Make sure your henna paste is right. Knowing how to look after it gets better results. Practice often to avoid getting frustrated.
Can I add decorative elements to my mehndi designs?
Yes, adding glitter or beads makes your mehndi stand out. It’s fun to try new decorations. This adds creativity and makes your designs personal.
How do I care for my mehndi designs to ensure they last?
Don’t put your design in water right away. Lightly moisturize, but avoid alcohol-based products. Caring for your mehndi this way makes it last longer.
Why is it important to document my mehndi journey?
Keeping track of your progress helps you see how you’re improving. Share your art on social media for feedback. This supports and inspires you to grow as a mehndi artist.
How can I connect with other mehndi artists?
Joining mehndi communities online or in person is great. This can lead to working together and learning more. Making artist friends is inspiring and helps you improve.